Table of Contents
- Setting up your Company Details
- Multi Companies
- Editing Your Companies
- Switch between Companies
- Transfer Employee from Company to Another
- Multi-Currency
- Setting up Work Location
- Modes of Attendance
- Setting up Designations
- Setting up Departments
- Employee Grades
- Docs
- Setting up Event
- Master Data
- Approval Configuration
- Emails Notification
- Checklist Configuration
- 1. Onboarding Checklist
- 2. Offboarding Checklist
- Setting up your Company Details
Much of your onboarding in Ojoor is complete when you define your Company Profile, Multi Organization, Locations, Departments, Shifts, Designations, etc. To set up, navigate by clicking the Setup Module and then Company data on the top menu.
To set up your company details.
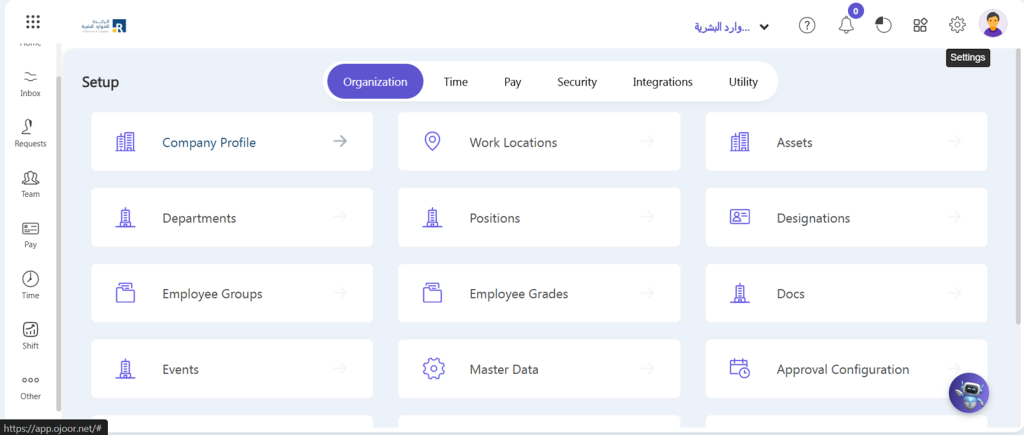
- Go to Setup > Organization > Company Profile.
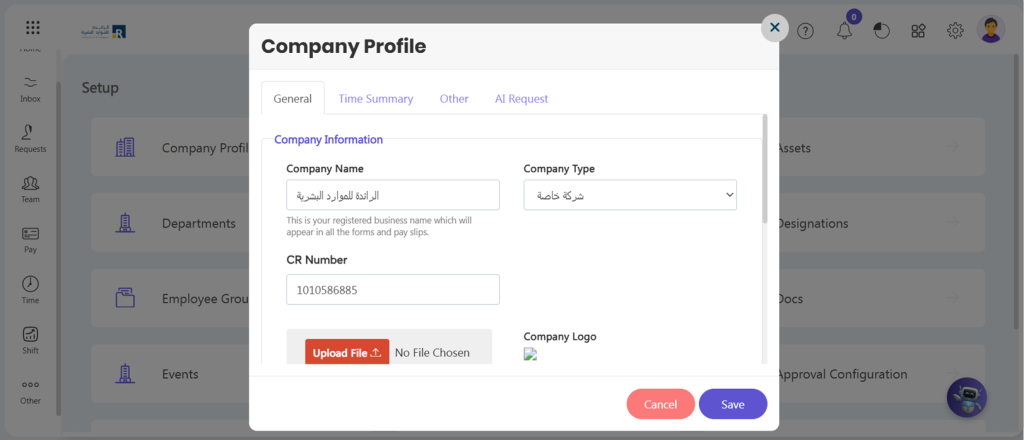
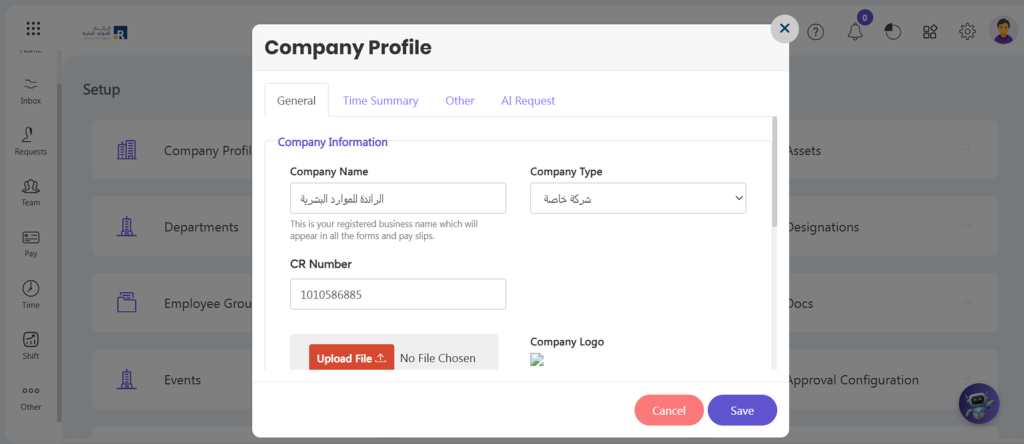
- The Company Profile popup screen will appear which is divided into two sections. i.e. General and Other.
- Go to the ‘General’ Section.
- Fill in all the necessary details such as your company name, company type, website URL etc.
- Company logo: Upload your company logo and cover image to make your profile look more professional and attractive.
- Allow Employee Life Cycle: If you don’t want to allow to anyone to edit employee some mandatory and most import fields.
- National ID Mandatory: Set if a National ID card is mandatory or not.
- Salary calculation Method: Define the salary calculation method either salary will be calculated according to Working Days, Calendar Days or Fixed Days.
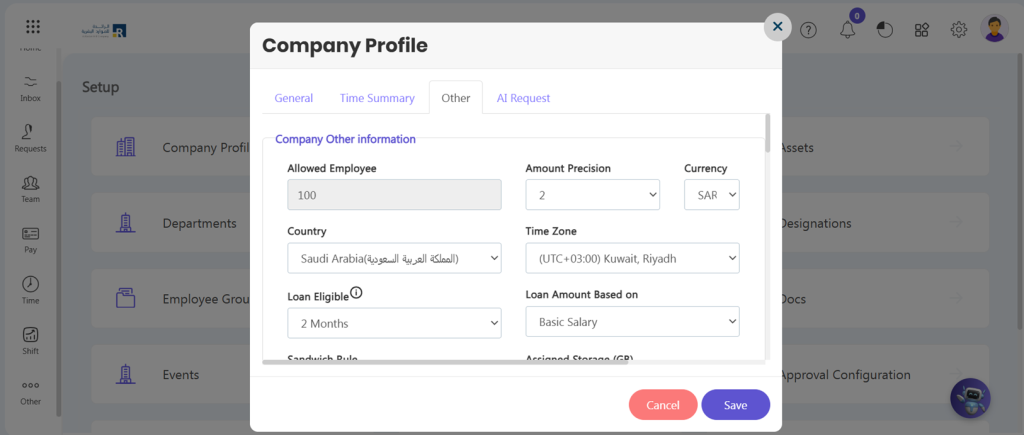
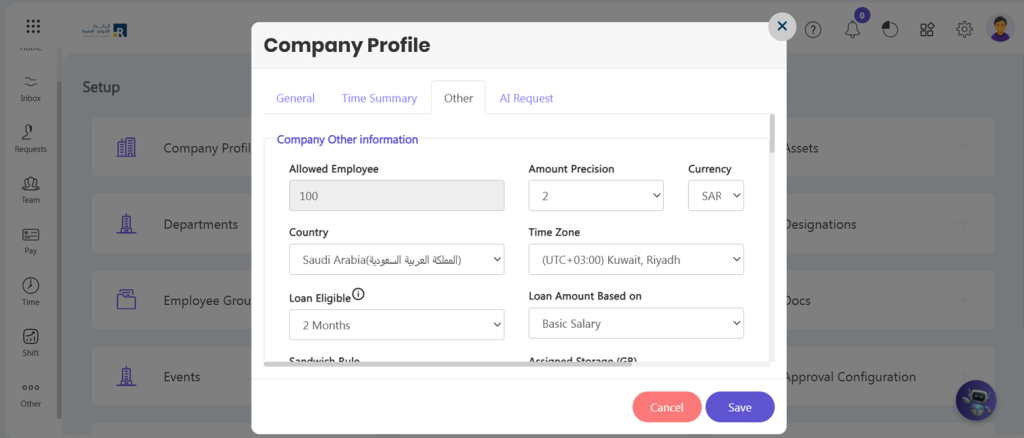
- Now go to ‘Others’ Section.
- Amount Precision: You can set precision in the amount of money that is paid out to our employees.
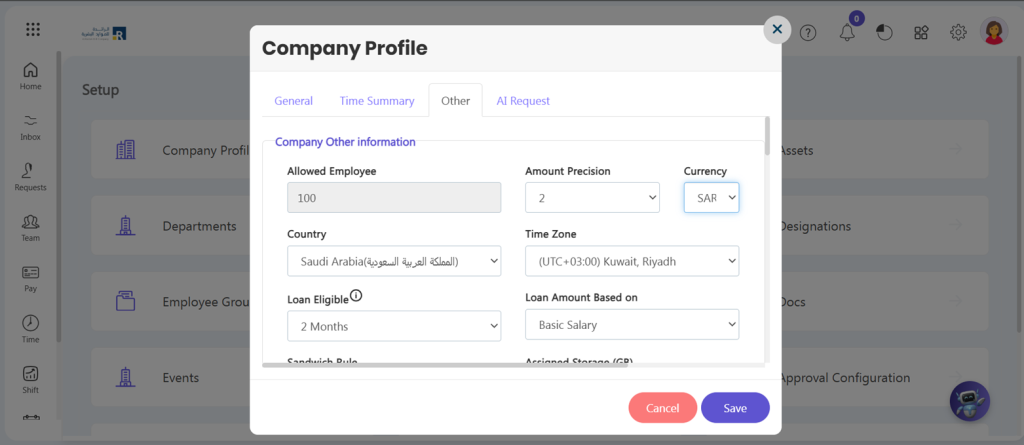
- Currency: You can set currency options to ensure that your employees are paid in their preferred currency.
- Country: You can set your company country here.
- Time Zone: You can set time zone according to your requirement.
- Eligible for Loan: You can set company loan policy also who will be eligible for loan.
- Loan Amount Based: You can set the loan amount based on either the Basic Salary or Gross Salary. This ensures that the loan request value does not exceed the selected salary component, maintaining compliance with your company’s policy.
- Allow Multiple Loan Requests: You can set this option to allow employees submitting more than one loan requests.
- Enable Multi-Factor Authentication (MFA): You can enable MFA for added security. This requires employees to verify their identity using an OTP (One-Time Password) sent to their registered email in Ojoor when logging into Ojoor from an unfamiliar or other browser.
- Min Check-in Max Check-out: This method calculates an employee’s total working hours by considering the first clock-in and the last clock-out of the day. It is a straightforward way to determine daily working hours without accounting for breaks.
- Time Span of Multiple Check-in/Check-out: This method calculates working hours by summing up the durations between each pair of clock-ins and clock-outs throughout the day. It provides a more detailed and precise calculation, considering all active working periods while excluding break times.
- Here you can set your company Attendance regulation Policy.
- Finally, click on the “Save” button to save your company profile.
2. Multi Companies
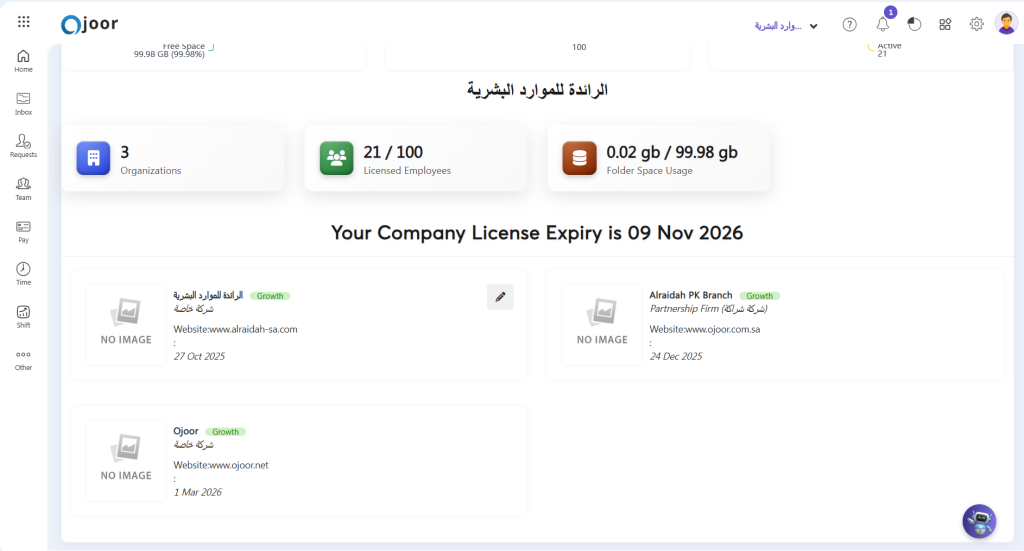
Using Ojoor, you can manage multiple organizations using a single email address and password of your Ojoor account. This gets efficient when you operate in multiple organizations with different lines of work. You can manage multiple organizations from one administrator account in Ojoor without having to use different email addresses and passwords.
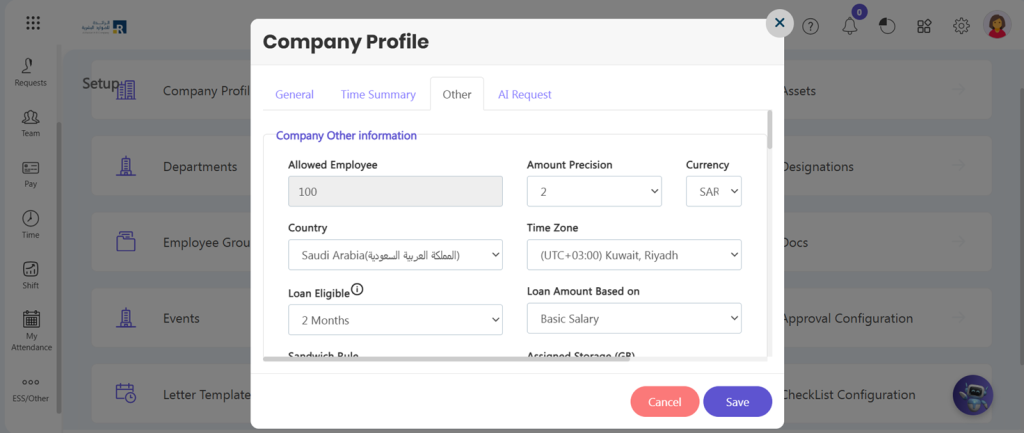
- Now go to Others Section.
- You can set Precision in the amount of money that is paid out to our employees.
- You can set Currency options to ensure that your employees are paid in their preferred currency.
- You can set Time Zone according to your requirement.
- You can set company loan policy also who will be Eligible for Loan.
- Set Variety of Pay Slip formats to choose from.
- You can set your company Gratuity Policy.
- Here you can set your company Attendance regulation Policy.
- Finally, click on the “Save” button to save your company profile.
- Your created organization will be visible in the Multi-Organization List.
Editing Your Companies
Editing your company profile in Ojoor is a simple process that can be done in just a few steps. Here’s how to do it:
- Hover on respective organization, edit button will be visible. Click on the “Edit” button located at the top right corner.
- Update the information you want to change, such as your company name, logo, address, phone number, and website.
- Once you have made the necessary changes, click on the “Save” button to save your edits.
- Your updated company profile will now be visible to your employees.
Switch between Companies
- You can switch your company by click company name from the top.
- After click company name drop down menu will be open select company.
You will be shift to the selected company dashboard.
Transfer Employee from Company to Another
If you need to transfer an employee from one company to another within Ojoor, it’s a simple process. Here are the steps you need to follow:
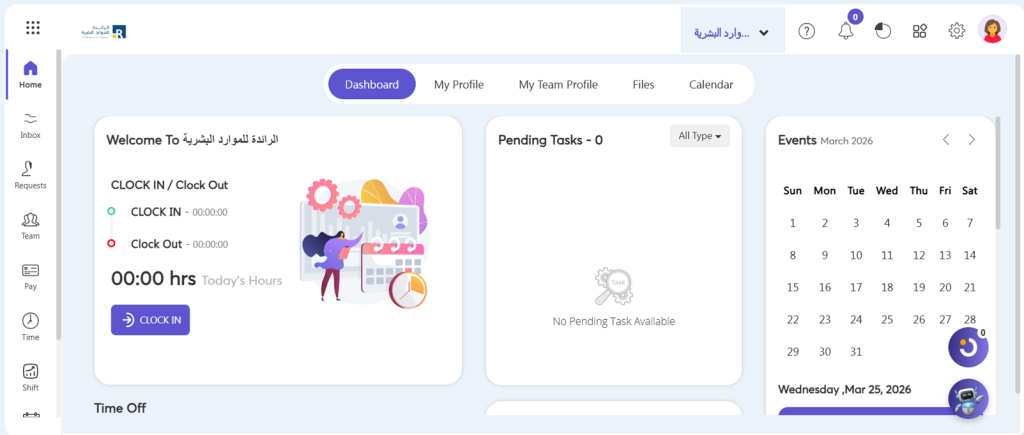
- Go to Requests > Employee Action > All Request > New Request
Note:
- All Request: If you want to add your team request.
- My Request: If you want to add your request.
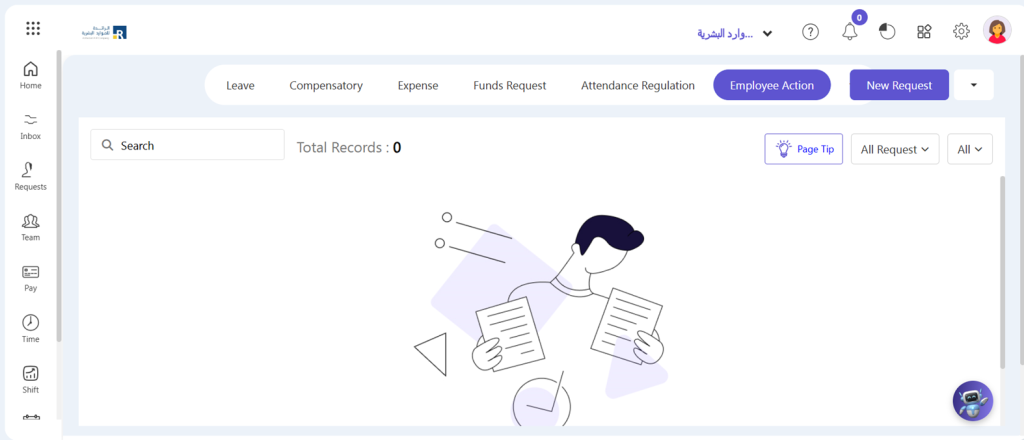
- A pop-up window will appear on the screen. Select Employee Name, check Inter Company Transfer checkbox and select Company where you want to transfer the employee.
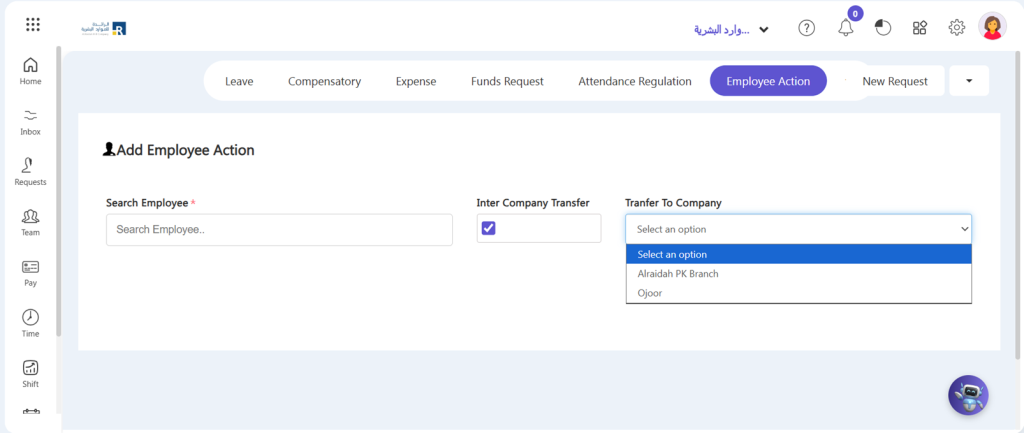
- Three sections will be visible to you i.e. Personal, Official and Salary for adding employee information.
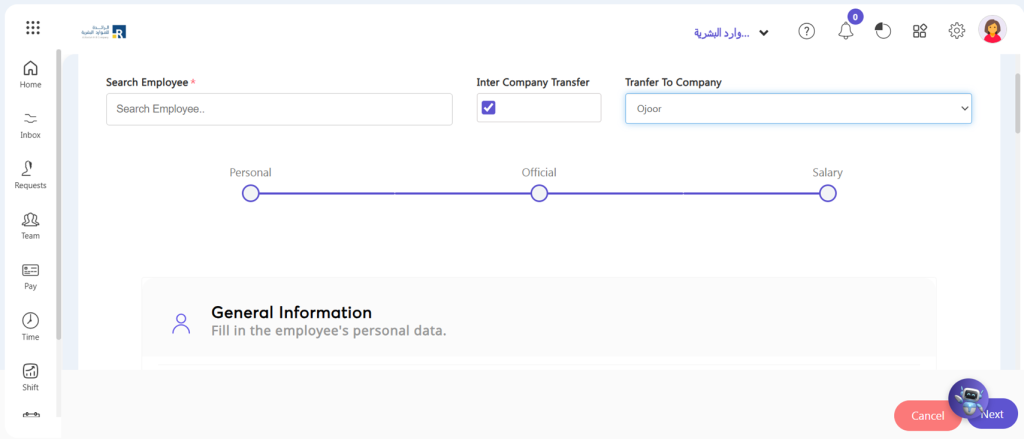
- Fill data in Personal section according to your requirements and click Next button.
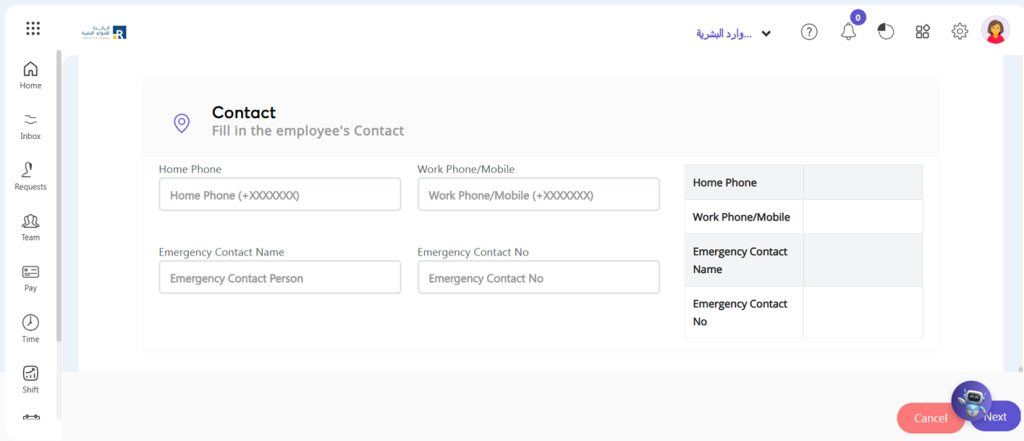
- Fill data in Official section according to your requirements and click Next button.
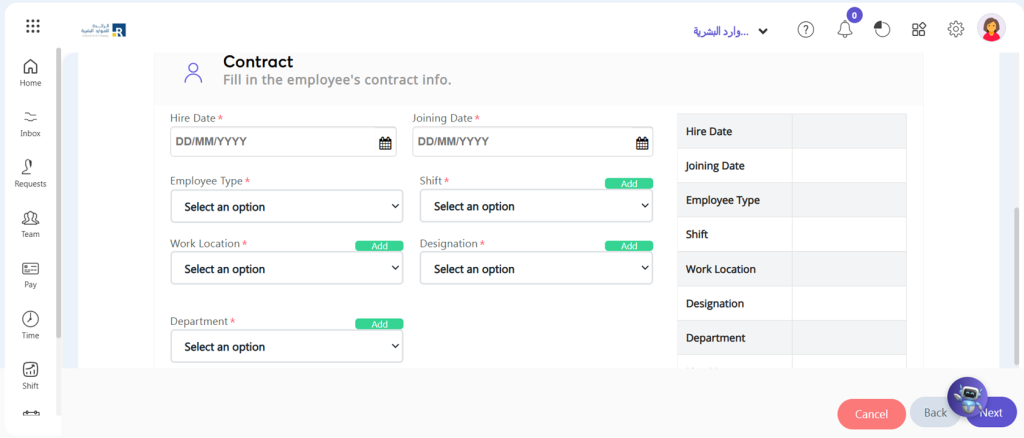
- After click submit button confirmation dialogue will be open on your screen” Are you sure you want to transfer this employee to another organization? “. Click OK button. Employee will be transferred successfully.
Once you’ve completed these steps, the employee will be transferred to the new company within Ojoor. Their employment history and other details will be retained in previous company, so you don’t need to worry about losing any important information.
Multi-Currency
You can set different currency for different Ojoor companies. For this,
- Go to Setup > organization > Company Profile.
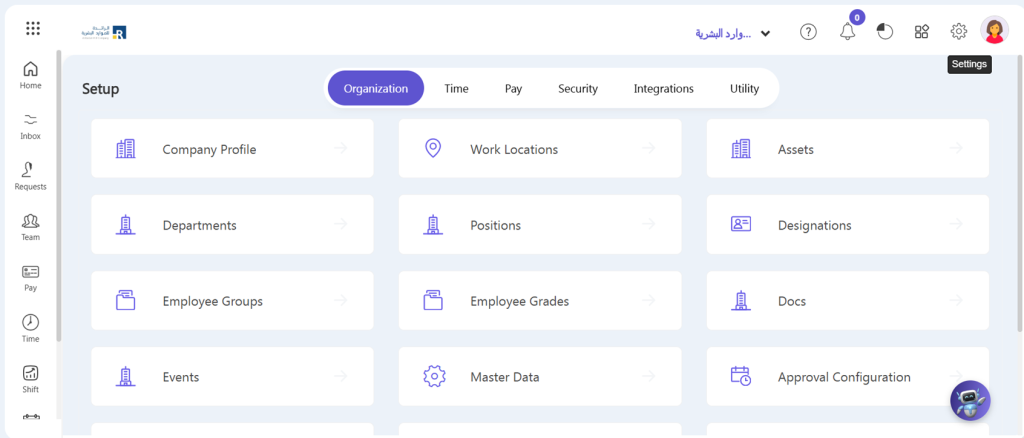
- Click Other
Setting up Work Location
If your organization has set up a working office in one or more than one location, you will have to create multiple locations. Follow the steps given below for doing this:
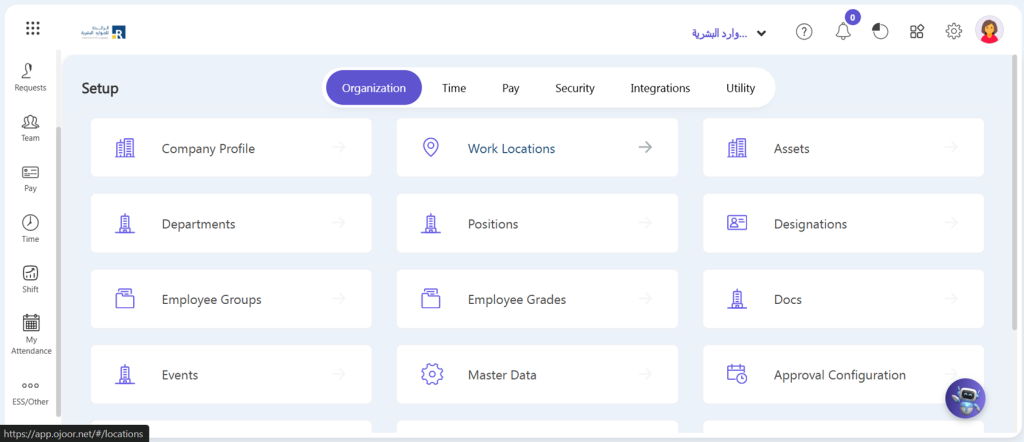
- Go to Setup > Organization > Work Locations.
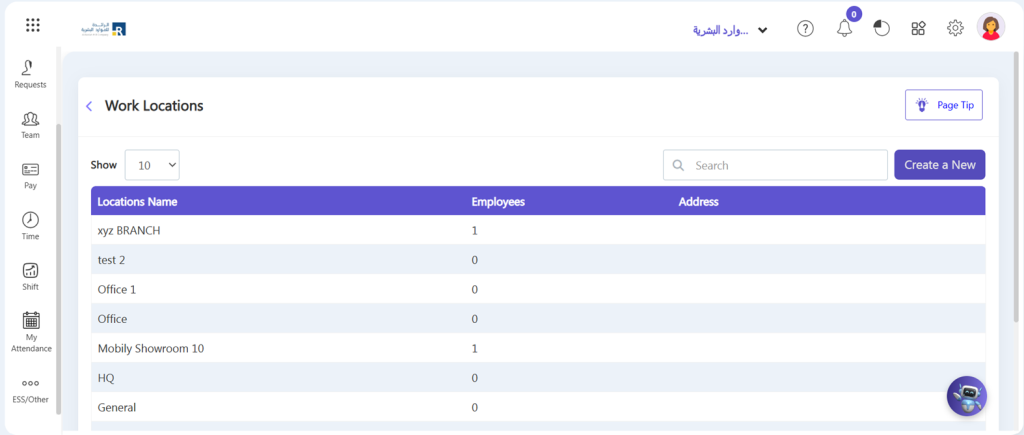
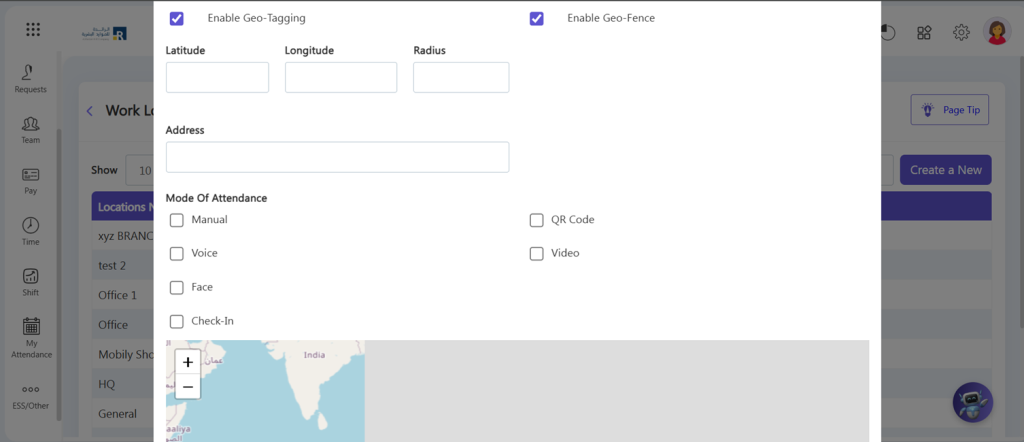
- This popup will appear where you can Add your work Locations efficiently by filling in the required information.
- Enter the name of the location. Select country and city.
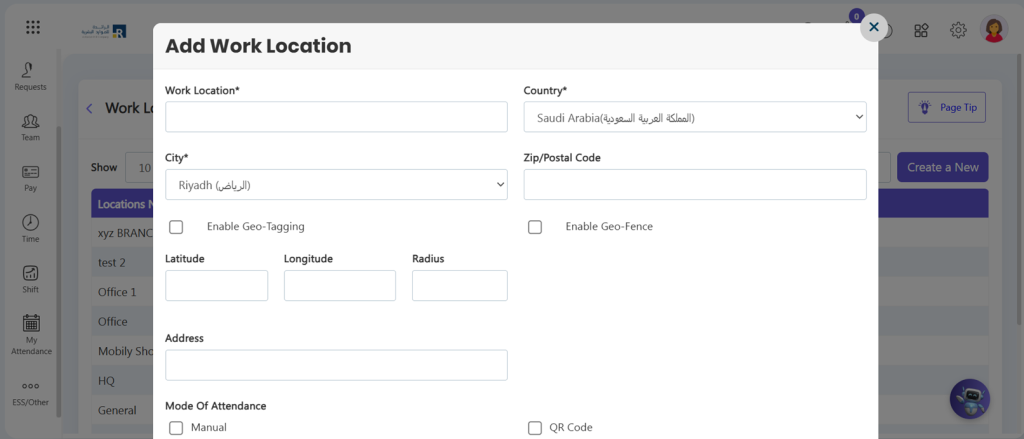
- Select geo-tagging and geo-fencing or both according to your requirements.
Note:
- ” Enable Geo-Tagging: Geo-tagging is the process of appending geographic coordinates based on the location of a mobile device. Enabling this option will allow your employees to mark their attendance from their mobiles and their current location will be saved.
- Enable Geo-Fence: Geo-Fence is also a method for attendance that can be marked by a mobile device. The difference between geo-tagging and geo-fencing is that in geo-fencing the employer has to define the particular coordinates and address with which the user would be able to mark his attendance. “
Modes of Attendance
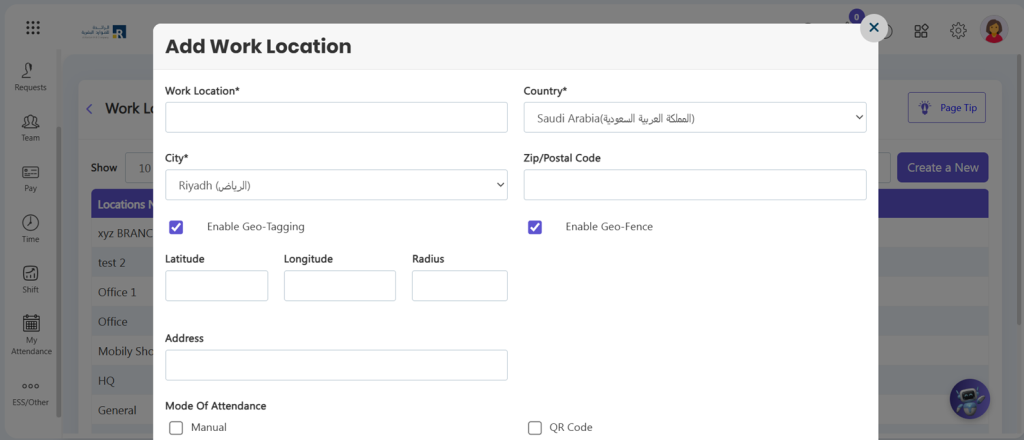
There are six modes of attendance in Ojoor.
- You can select one or more than one mode you want to allow your employees for marking attendance.
Setting up Designations
Designations in Ojoor are an essential part of managing your organization’s structure and employee roles. Setting up designations is a simple process that can be done in just a few steps. Here’s how:
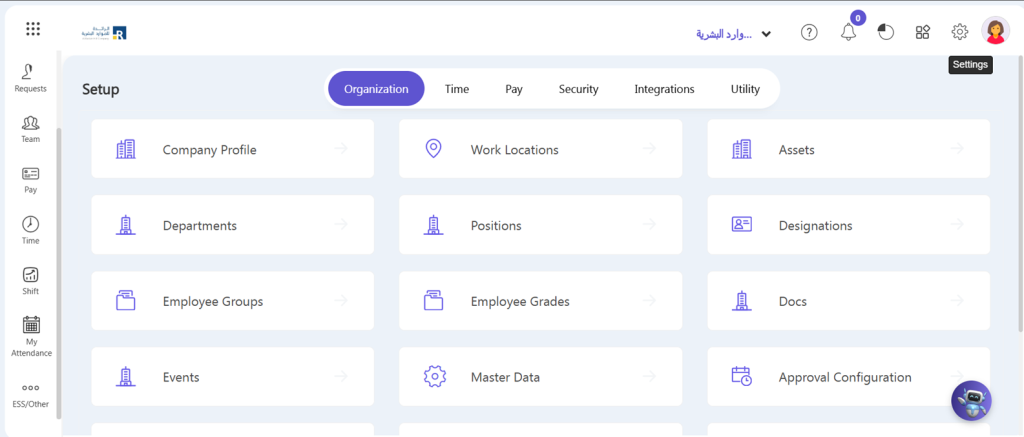
- Go to Setup > Organization > Designations.
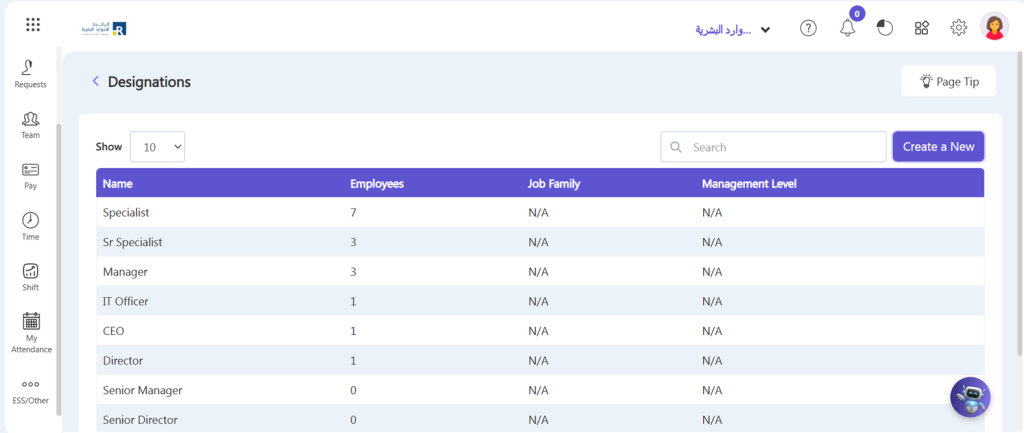
- Click on ‘Create a New ‘button.
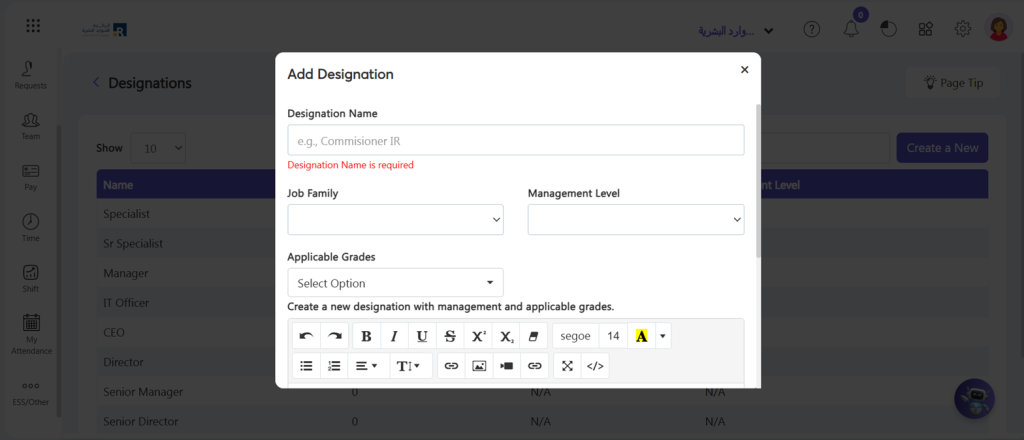
- Enter the Designation Name.
- Click the Save button and your designation has been created and will show on the designations page.
Setting up Departments
Setting up departments in Ojoor. is an essential step in organizing your business and streamlining your operations. Here’s how you can do it:
- Navigate to Setup > organization > Departments.
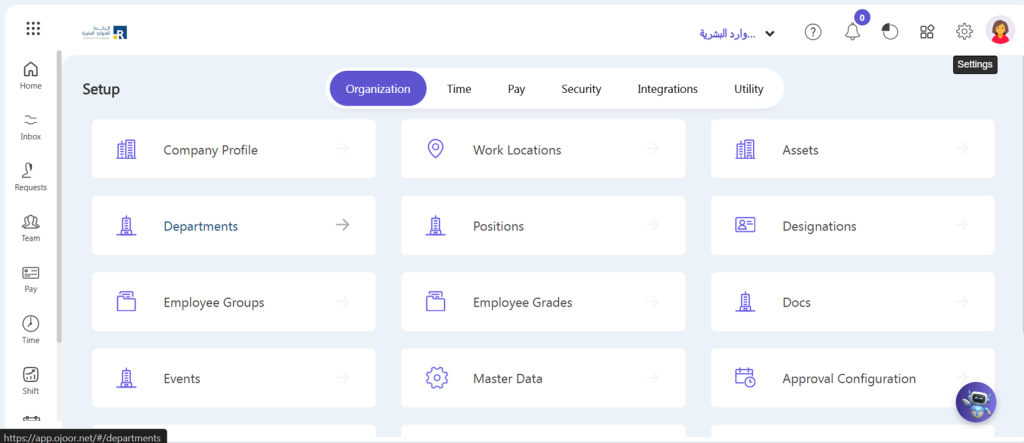
- Click on “Create a New” button
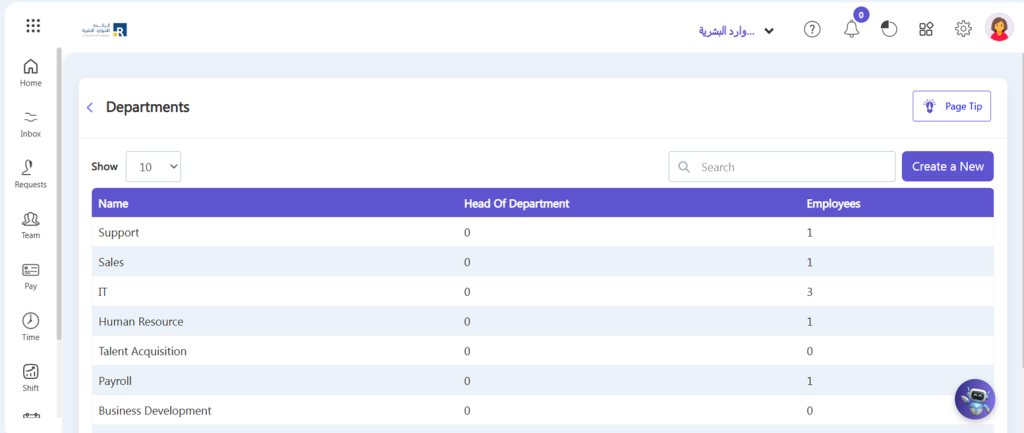
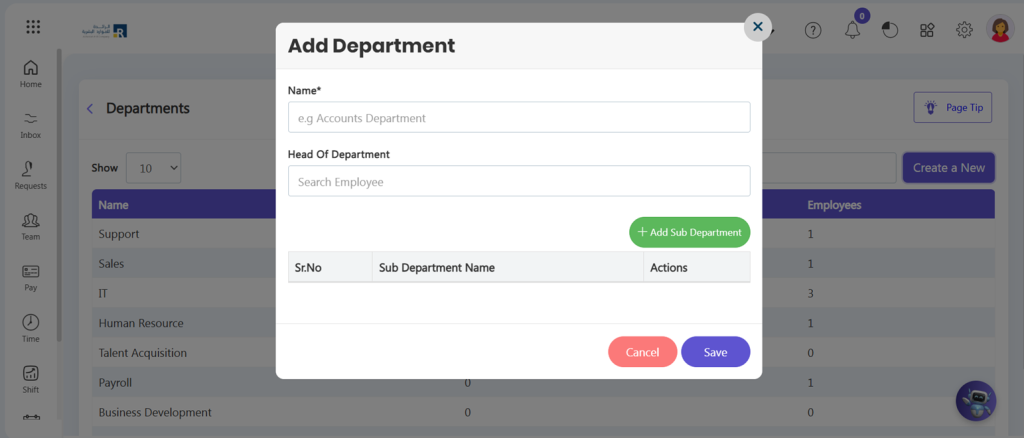
- The popup window will appear.
- Enter the name of the department. You can add head of department.
- You can also add sub department
- Click on “Save”.
- Department will be added successfully and visible on department screen.
Employee Grades
Creating employee grades in Ojoor. is a simple process that can be done in a few easy steps. Follow the steps below to create employee grades in Ojoor:
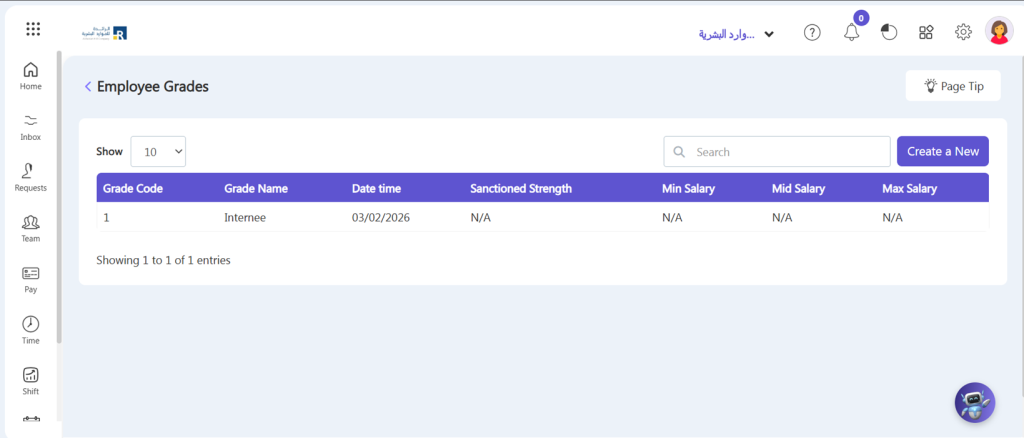
- Navigate to the Setup > organization > Employee Grades.
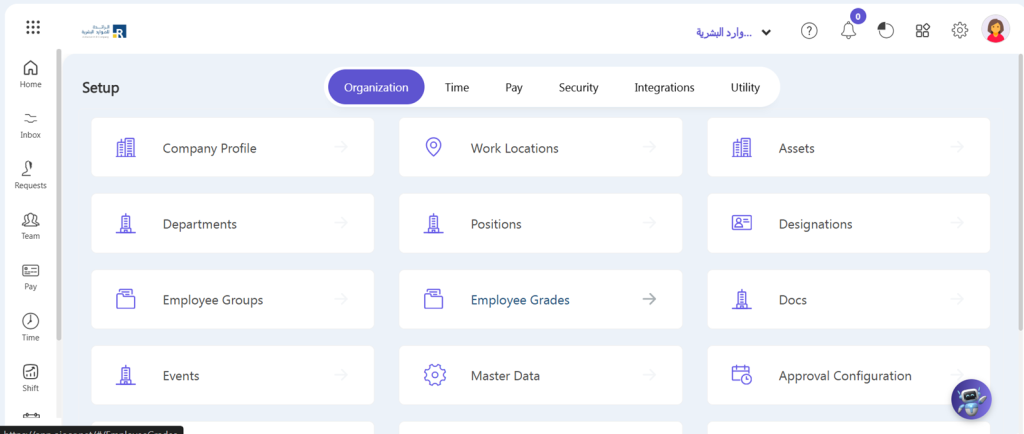
- Click on the “Create a New” button to create a new employee grade.
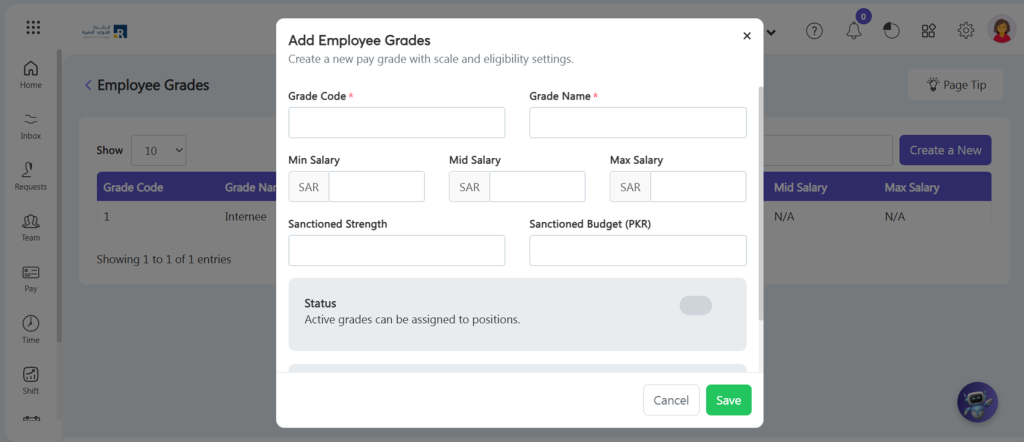
- Enter the Grade Code and Grade Name.
- You can link your created grade with Expense.
- Click on the “Save” button to save the employee grade.
Docs
Click here to learn about Docs Section.
Setting up Event
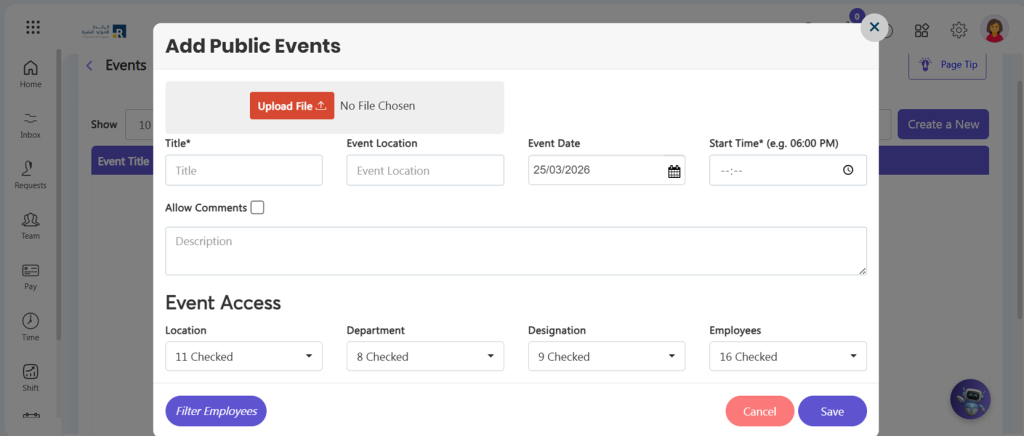
Ojoor allows you to add events that will take place within the company in the next few days. The message will appear in the dashboard’s Upcoming Events section.
- Go to the Setup > organization > Events.
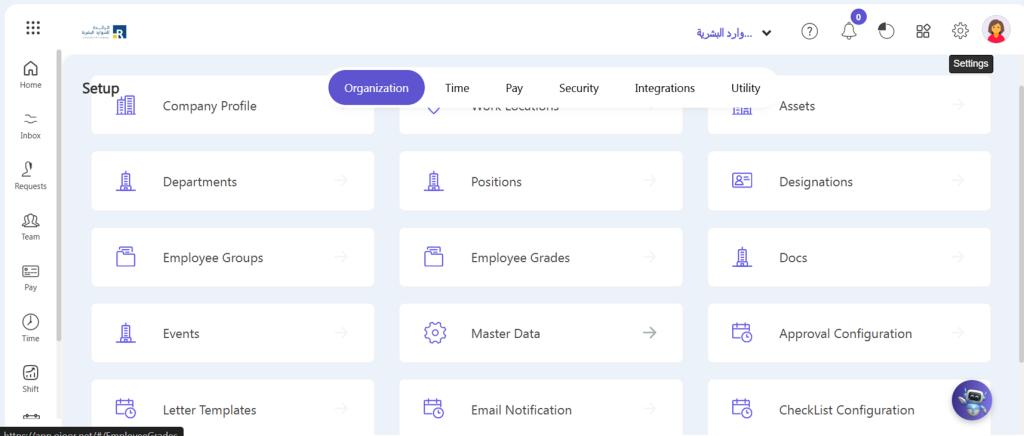
- Click on the “Create a New” button.
- For an event, you can attach a file and write a description of the event.
- Give the event a title, a location (where it will be hosted), a date, and a time.
- You can send Event Invitations to certain departments, individuals, or the entire organization using Event Access.
- You can allow employees to comment on events to gain feedback.
- Click “Save” button.
Master Data
In Ojoor, you can create custom fields by using master data that can be done in a few easy steps. Here’s how:
- Navigate to the Setup > organization > Master Data.
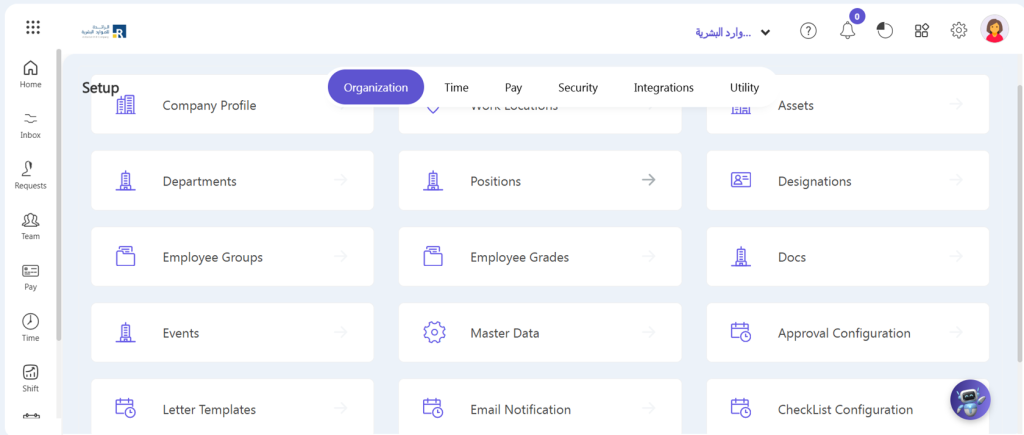
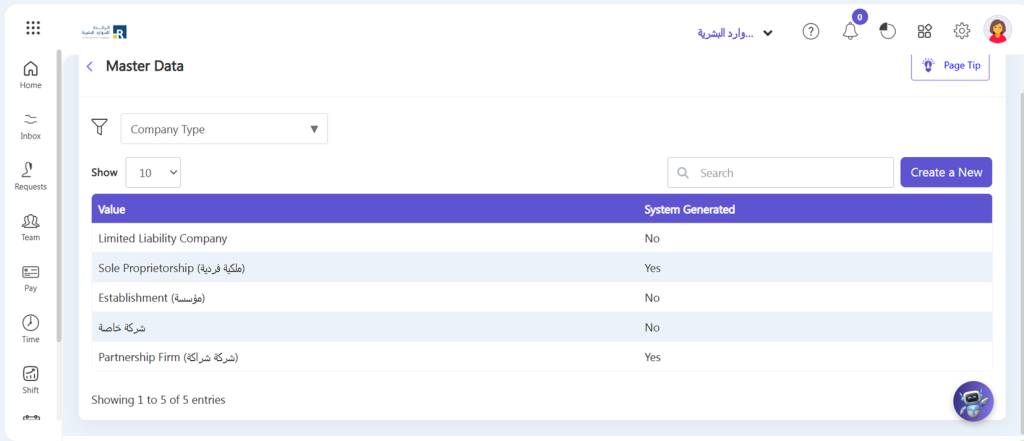
- Select the type of master data you want to create, such as “Country” or “Expense Type “.
- Select value from the drop-down to which you want to add value.
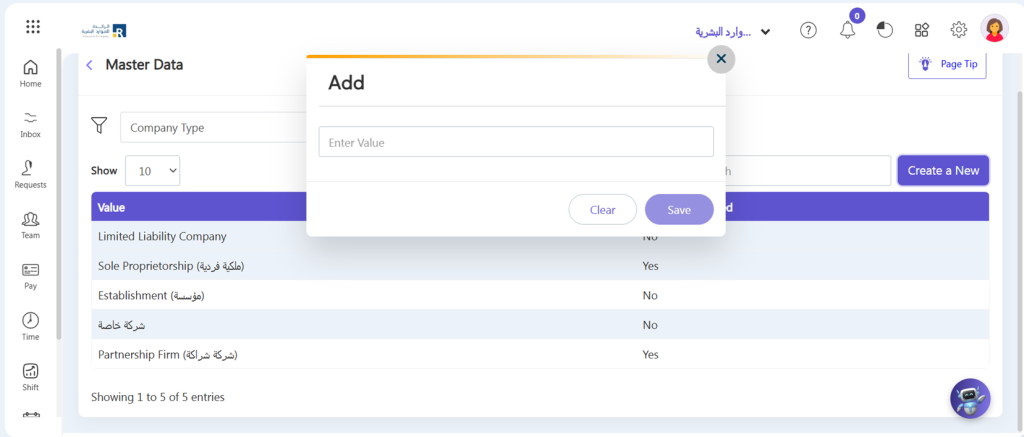
- Click Create a New.
- Window will open write name click Save button.
Approval Configuration
Approval is a well-defined procedure for obtaining employee consent for official work or special demands. Managers and other members of the hierarchy are frequently involved in the approval process.
Ojoor Approvals feature automates the entire approval process and can be used to accomplish a variety of HR tasks.
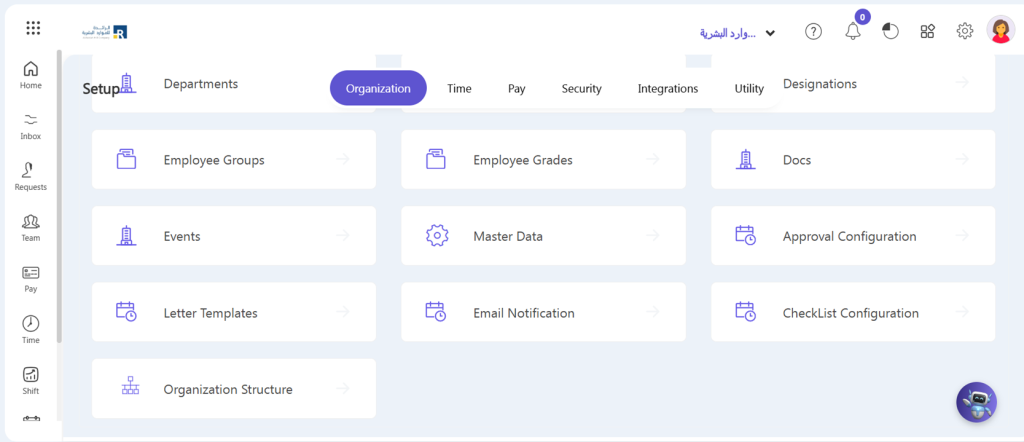
- Go To Setup -> Organization -> Approval Configuration
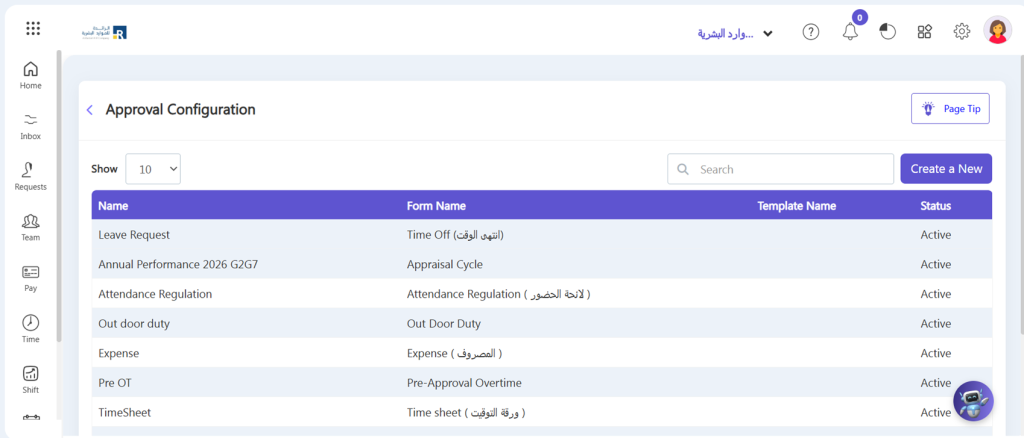
- Click on “Create a New” in the top right corner.
- Fill in the required fields that appear on the screen and click Save.
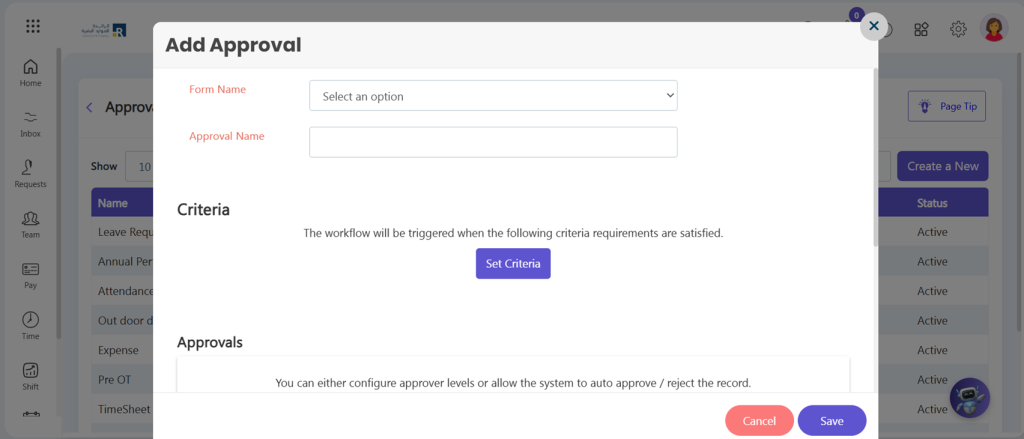
- Enter a name for your configuration and select the type of approval you want to set up (e.g., Time off approval, expense approval, etc.).
- Define the approval workflow by adding the necessary approvers and setting the approval configuration. You can also set up multiple levels of approval if needed.
- Choose the form for which the approval is being configured and give the approval process a name.
- You can pick auto-approve or auto-reject under Approvals or click Configure Approver. You can select from these approvers: Reporting To, Single and Multiple Level, Approver based on Role, Department Head, Department Members, and Project Manager-based approval.
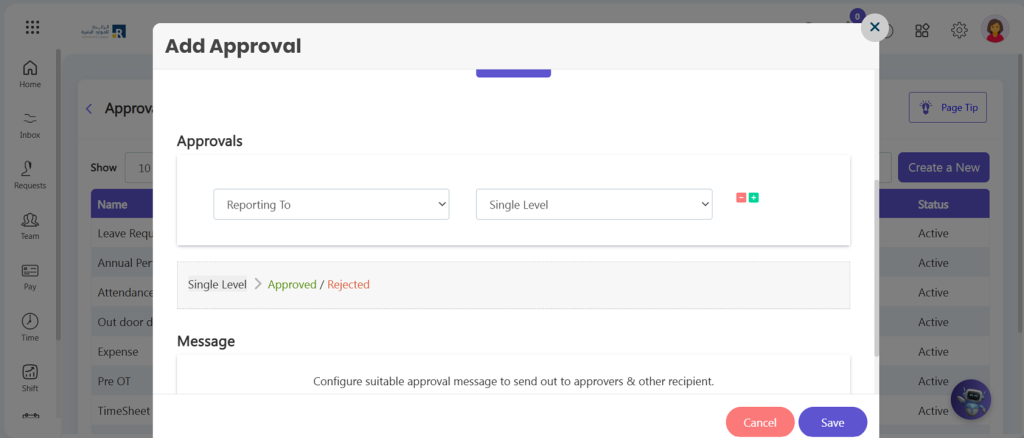
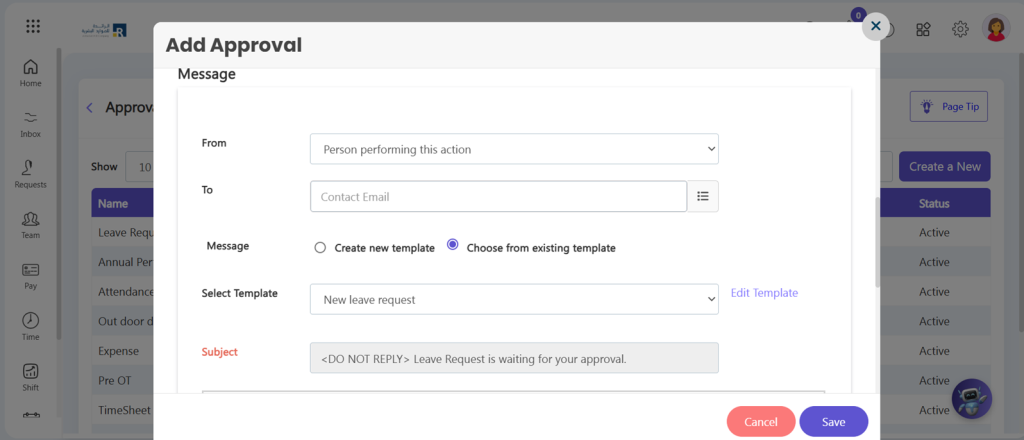
- If you want the follow-up emails to be sent, add the Message template for approval.
- Fill in the approval message you’d like to add to the email.
- When a request for leave is submitted, standard templates for notification will be required. This is a one-time configuration that can be used based on the details of the corresponding employee.
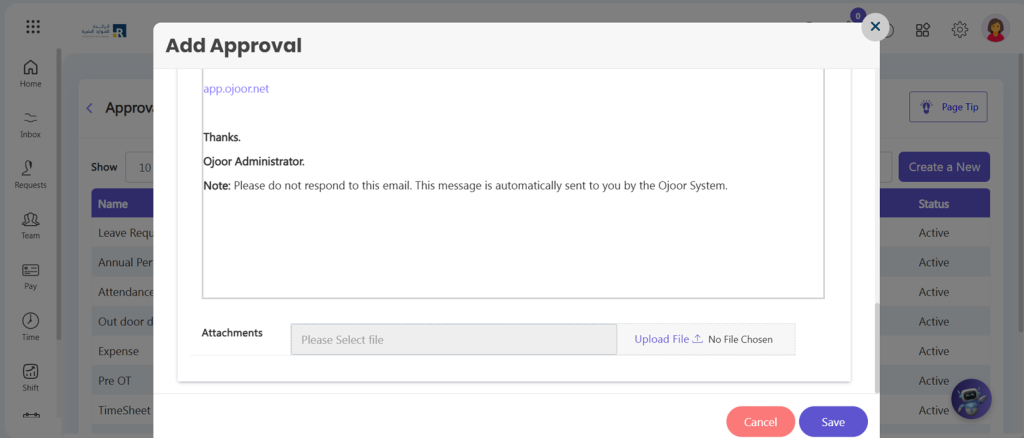
- You can also upload a document related to the email and attach it.
- Save your configuration by click “Save” button and test it to ensure that it is working as expected.
Emails Notification
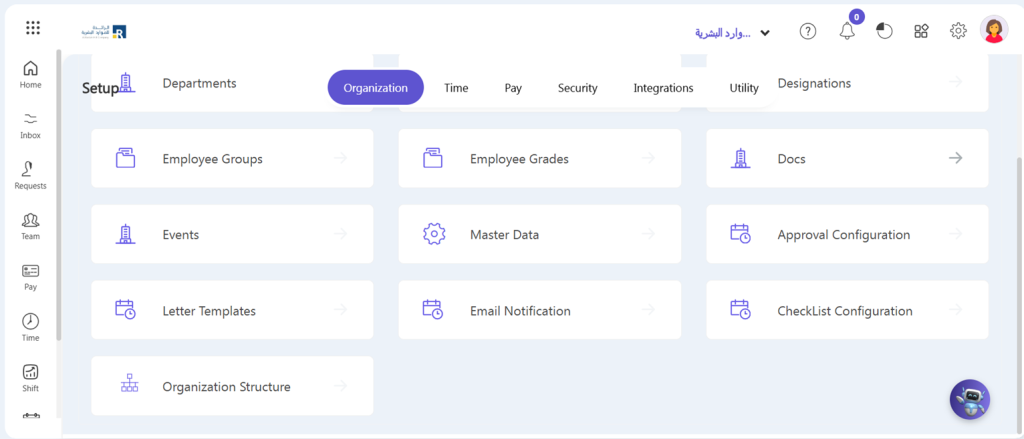
This feature allows HR teams/Admin to automate reminders and notifications for important dates and events, reducing manual effort and ensuring no critical event is missed. It enhances employee engagement (e.g., sending birthday wishes) and supports operational efficiency (e.g., probation period reminders). To create emails notifications
- Go to Setup => organization => Email Notification
- Click Create a New
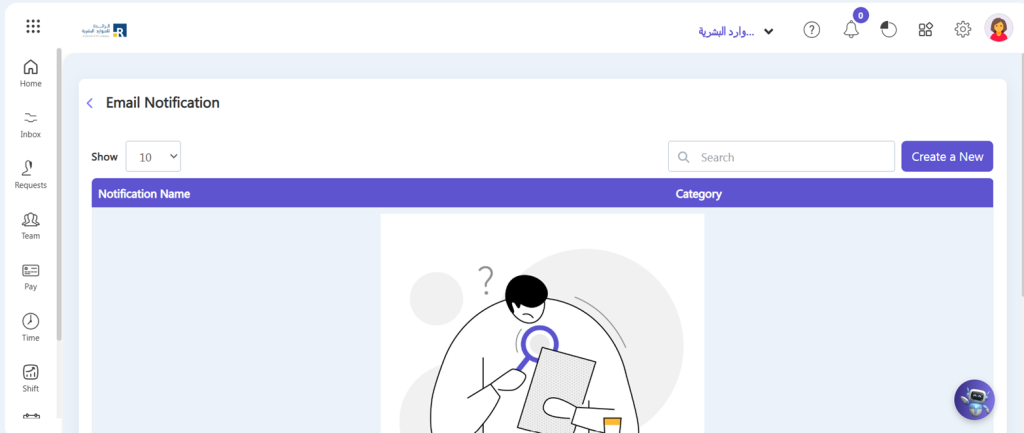
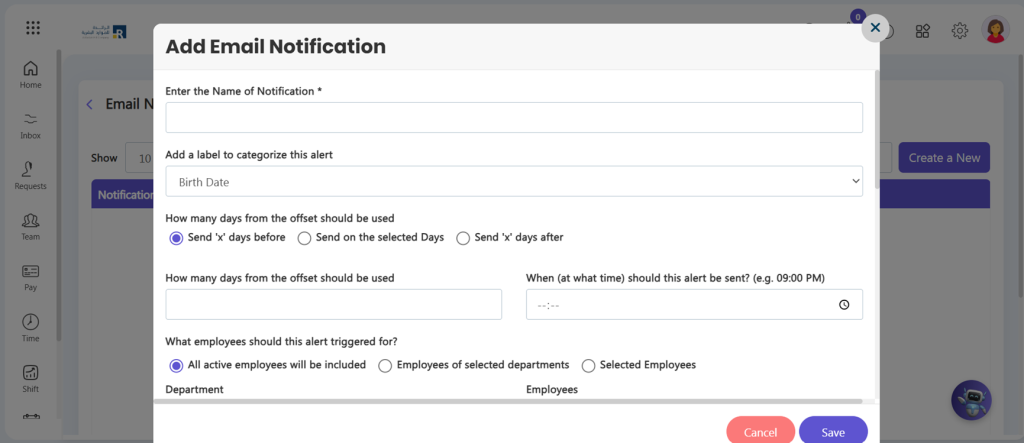
This functionality in Ojoor HRMS allows administrators to create, configure, and automate notifications for various employee-related events. Here’s a detailed explanation of how each field works:
- Enter the Name of Notification:
- Define a clear and specific name for the notification, such as “Birthday Alert” or “Probation Reminder,” to make it easily identifiable.
- Add a Label to Categorize This Alert:
- Use labels like “Birth Date,” “Hire Date,” “Employee Creation,” “Employee Update,” or “Probation Date” to categorize and organize alerts based on the type of event.
- How Many Days from the Offset Should Be Used:
- Specify a time offset (e.g., 7 days) to determine when the notification should be triggered relative to the event.
- Send ‘X’ Days Before:
- Set the notification to be sent a specific number of days before the event date (e.g., 1 days before a birthday date).
- Send on the Selected Days:
- Select specific days for the notification to be sent (e.g., send on the day of the event or specific days).
- Send ‘X’ Days After:
- Configure the notification to trigger a certain number of days after the event (e.g., 3 days after an employee’s hire date).
- When Should This Alert Be Sent?
- Define the exact time for the notification to be sent (e.g., 09:00 AM). This ensures timely delivery and relevance of the alert.
- What Employees Should This Alert Be Triggered For?
- All Active Employees: The alert will be sent to all employees who are currently active in the system.
- Employees of Selected Departments: Notifications will target employees within specific departments (e.g., HR, IT).
- Selected Employees: Notifications will be sent only to manually selected individuals.
- Department and Employees Selection:
- You can choose the departments or specific employees from the list to refine the target audience for the alert.
- Subject:
- Define the subject of the notification email or message to clearly communicate its purpose (e.g., “Happy Birthday!” or “Probation Period Ending Soon”).
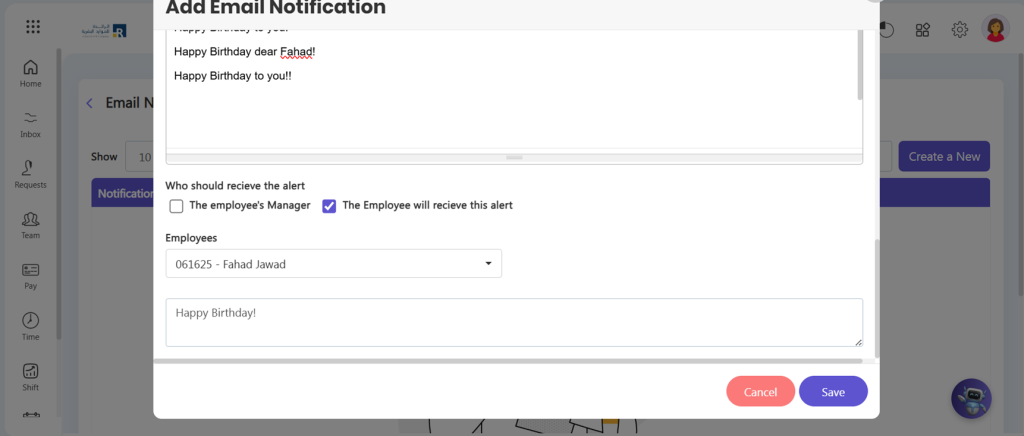
- Who Should Receive the Alert
This field allows you to define the recipients of the alert, ensuring that notifications are sent to the relevant individuals. Here’s how each option works:
- The Employee’s Manager:
- Select this option to notify the employee’s immediate manager. This is useful for alerts such as probation period end dates, performance reviews, or any event requiring managerial awareness or action.
- Employees:
- Allows you to specify multiple employees who should receive the alert. This is ideal for notifications like birthday wishes, policy updates, or reminders.
- Description
- The description field allows you to provide additional context for the notification. This ensures recipients understand the purpose of the alert. For example:
- Birthday Reminder: “Dear [Name], wishing you a fantastic birthday and a wonderful year ahead!”
- Probation Reminder: “Your probation period is ending soon. Please contact HR for further details.”
Checklist Configuration
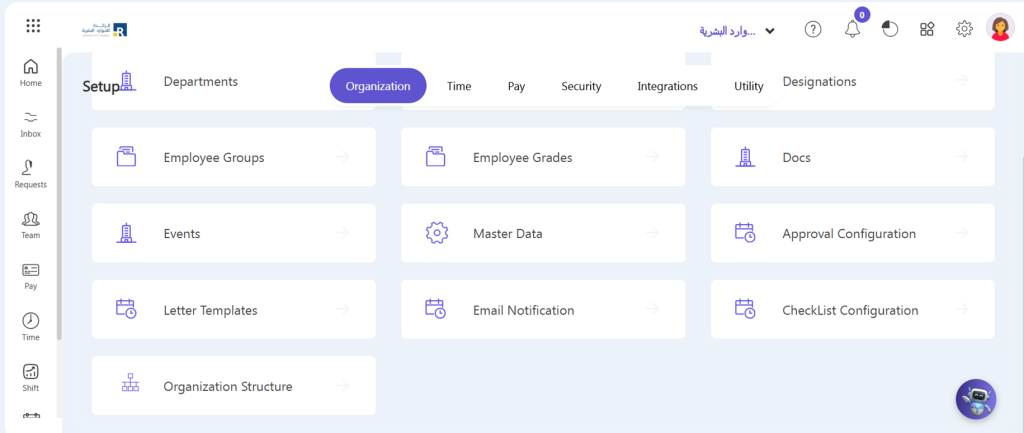
The Checklist Configuration feature in Ojoor HRMS enhances organizational efficiency by providing a structured, automated framework for managing onboarding and offboarding processes. This ensures all tasks are completed in a timely, consistent, and professional manner. To perform this:
- Go to Setup => organization => Checklist Configuration
Onboarding Checklist
The Onboarding Checklist is designed to facilitate a smooth and organized introduction for new employees, ensuring they feel welcomed and prepared to start their journey.
Onboarding is the process of integrating a new employee into an organization. It involves familiarizing the employee with company policies, culture, and their role while providing the necessary tools and resources to help them succeed .
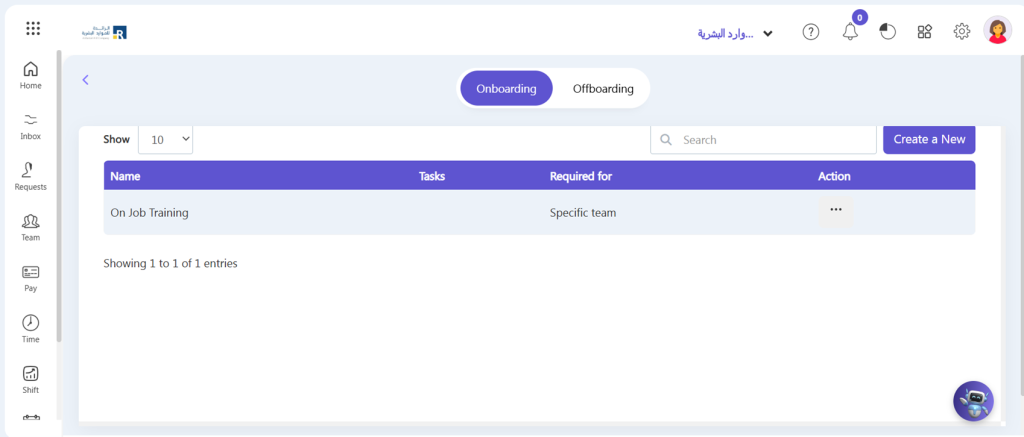
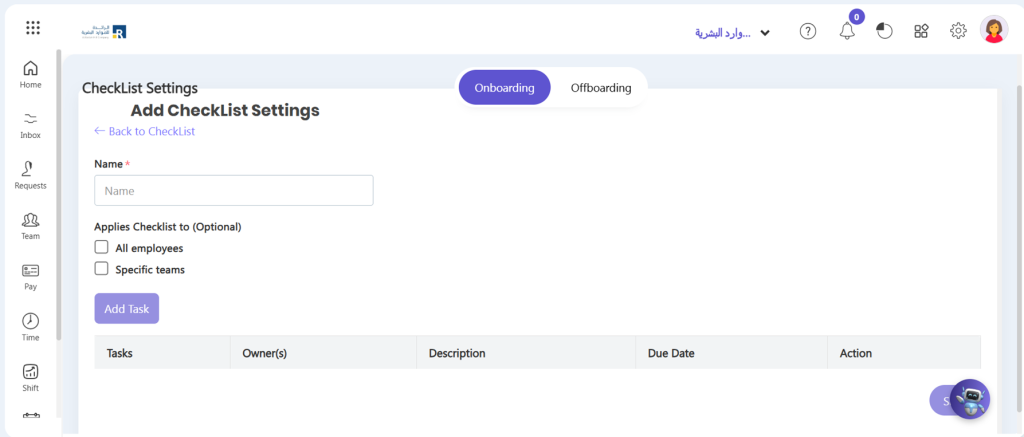
- Click Onboarding => Create a new button to create onboarding task
- Specify the name of the checklist for easy identification.
- Example:
- “Onboarding Checklist for New Hires”
- You can apply the checklist universally to all employees in the organization.
- You can restrict the checklist to specific teams.
- Click Add Task button to add onboarding tasks list.
- Name
- Provide a clear and descriptive title for the task.
- Example: “Assign Assets to New Hire”.
- Description
- Add a detailed explanation of the task’s purpose and instructions.
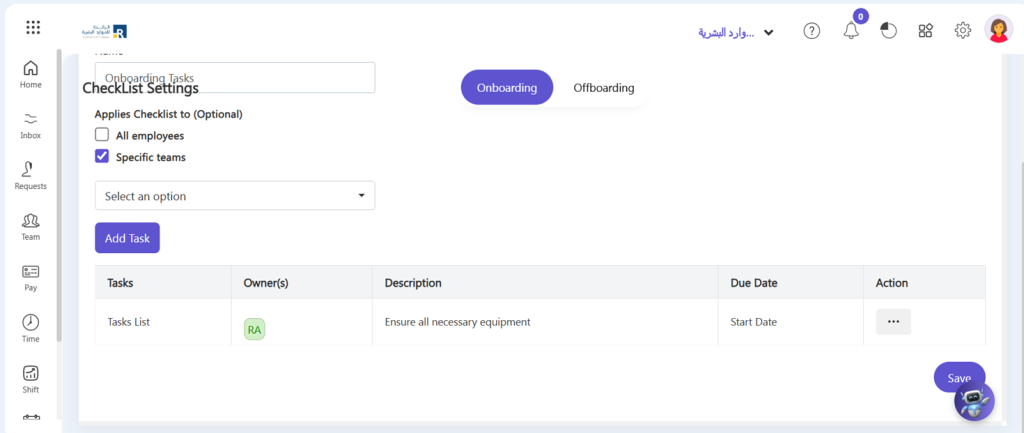
- Example: “Ensure all necessary equipment and resources are assigned to the new hire before their first day. This includes hardware, software credentials, and access passes. “
- Task Recipient Options
- Do you want all administrators to receive this task?
- Selecting this ensures that all administrators are notified and responsible for the task.
- Do you want all managers to receive this task?
- Selecting this notifies all managers, making them responsible for completing or supervising the task.
- Do you want the employee being onboarded to receive this task?
- Selecting this sends the task directly to the employee being onboarded.
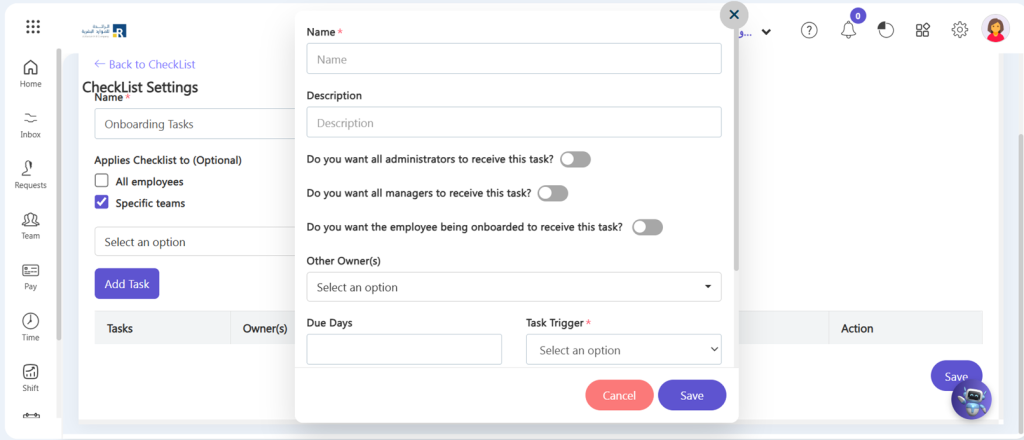
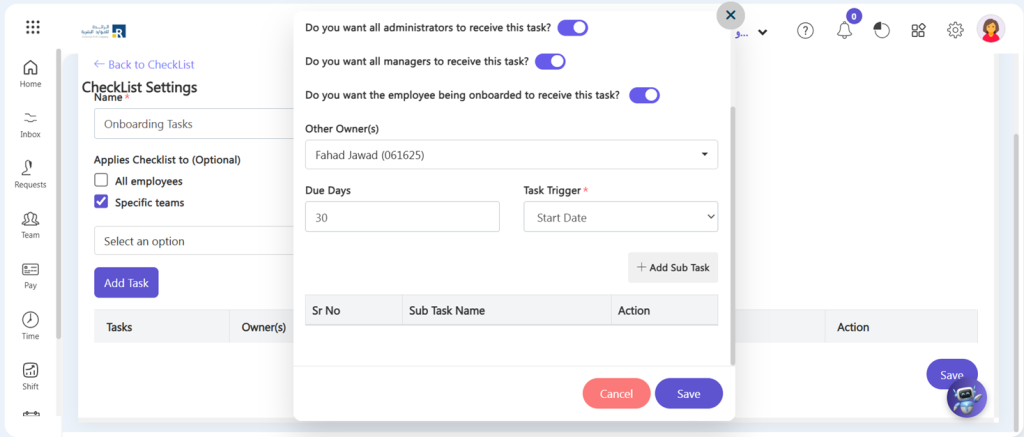
- Other Owner(s): Assign additional stakeholders responsible for completing or overseeing the task.
- Due Days: Define the time frame within which the task must be completed after the task trigger occurs.
- Task Trigger: Select the event that initiates the task.
- Add Sub Task: Add tasks list by click add sub task button.
- Click save.
- Click save button to save the onboarding.
Offboarding Checklist
The Offboarding Checklist provides a systematic approach to managing employee exits, minimizing disruptions, and ensuring compliance with organizational policies.
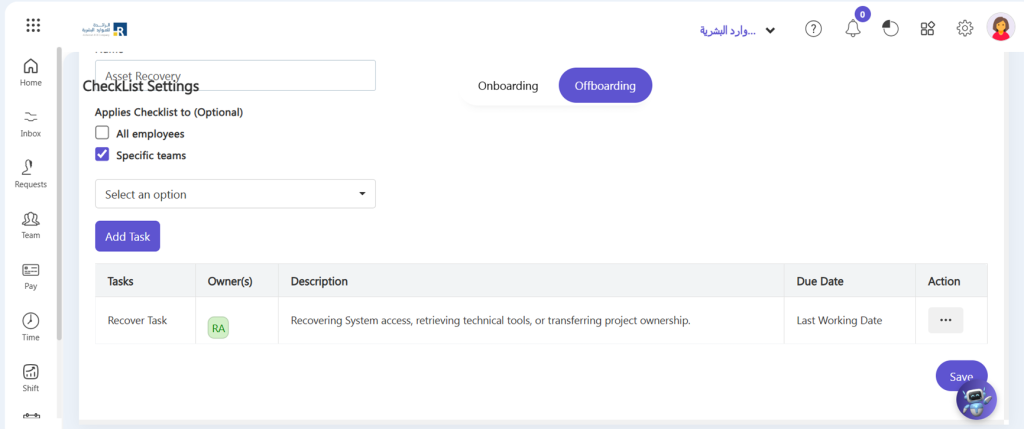
- Click Offboarding => Create a new button to create offboarding task
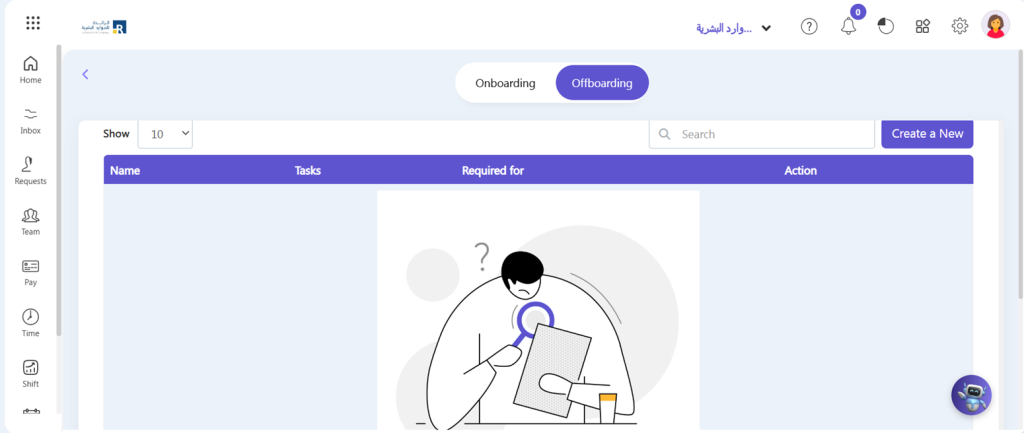
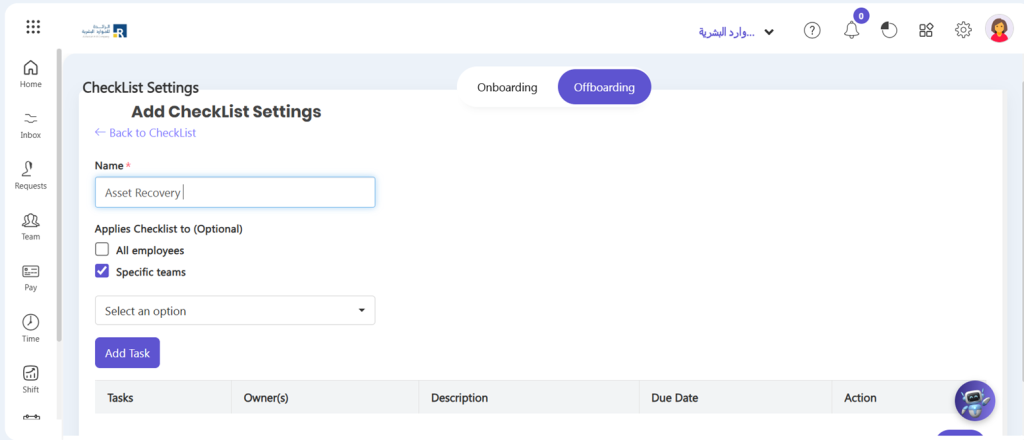
- Specify the name of the checklist for easy identification.
- Example:
- Offboarding Checklist for Resigned Employees
- You can apply the checklist universally to all employees in the organization.
- You can restrict the checklist to specific teams.
- Click ‘Add Task’ button to add offboarding tasks list.
- Name
- Provide a clear and descriptive title for the task.
- Example: “Conduct Exit Interview”.
- Description
- Add a detailed explanation of the task’s purpose and instructions.
- Example: “Retrieve all company-issued assets from the departing employee. “
- Task Recipient Options
- Do you want all administrators to receive this task?
- Selecting this ensures that all administrators are notified and responsible for the task.
- Do you want all managers to receive this task?
- Selecting this notifies all managers, making them responsible for completing or supervising the task.
- Do you want the employee being onboarded to receive this task?
- Selecting this sends the task directly to the exiting employee.
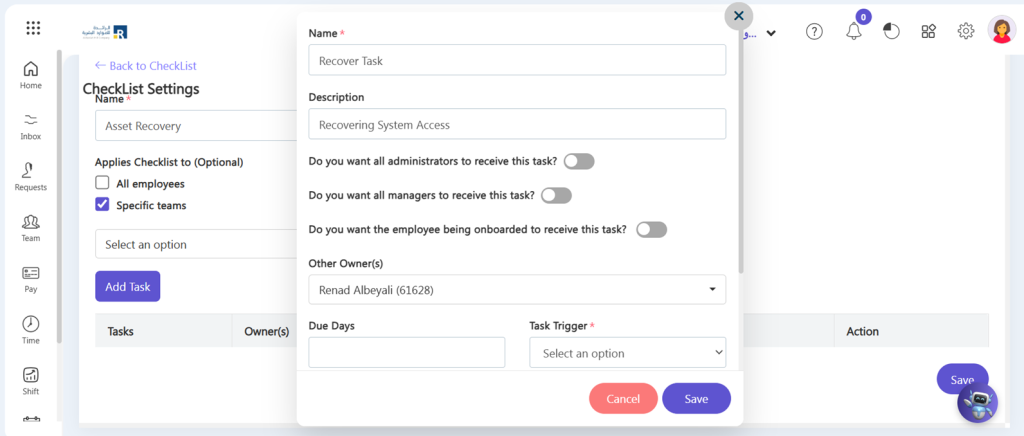
- Other Owner(s): Assign additional stakeholders responsible for completing or overseeing the task.
- Due Days: Define the time frame within which the task must be completed after the task trigger occurs.
- Task Trigger: Select the event that initiates the task.
- Add Sub Task: Add tasks list by click add sub task button.
- Click save.
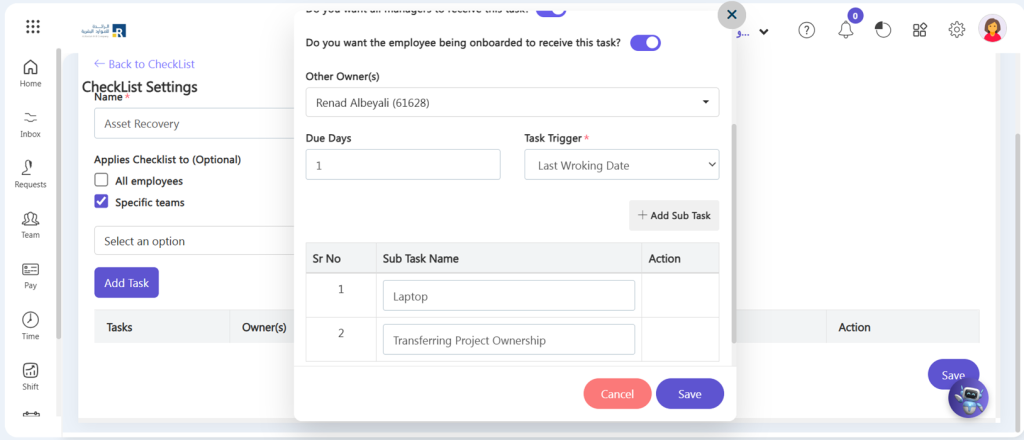
- Click save button to save the offboarding task.