• Products

    Payroll Software

    Automate, timely pay employees, and maintain compliance

    Modern HR

    Utilize a current platform for people to do more

    Recruitment Management

    Before and after joining, provide a Positive Candidate Experience


    Integrations

    Your HR software is compatible with all of your preferred Tools

    LMS

    Smarter learning, simpler growth.

    Performance & Careers

    Objectives and Key Results (OKRs), ongoing criticism

    Time & Attendance

    Track time, manage leaves, and make payments on time

    Timesheet Software

    Workflow that may be customised to track usage and time


    Security

    Your employee data is safe and Constantly Accessible

    Mobile App

    HR made easy: manage, track, and connect anytime, anywhere.

  • Customers

    Customers

    Support

  • Pricing
  • About Us

    Our Story

    Our Team

    Partners

    Contact Us

  • AI Agents

    AI ATS

    AI PMS

    AI LMS

    AI Buddy

Sign Up
Log In
HOME

HOME

  • Products
    • Payroll Software
      • Compliance
      • Expense Management
      • Compensation
      • Loans & Advances
      • Employee Finances
    • Performance & Careers
      • 360 - Degree Reviews
      • OKRs & Goals
      • Continuous Feedback
    • Modern HR
      • Employee Profiles
      • Documents
      • Task Management
      • Pulse Surveys
      • HR Analytics
    • Time & Attendance
      • Attendance Management
      • GPS / Mobile Attendance
      • Shift Management
    • Recruitment Management
      • Applicant Tracking
      • Employee Onboarding
    • Timesheet Software
    • Integrations
    • Security
    • LMS
    • Mobile App
  • Customers
    • Customers
    • Support
  • Pricing
  • About Us
    • Our Story
    • Our Team
    • Partners
    • Contact Us
  • AI Agents
    • AI ATS
    • AI PMS
    • AI LMS
    • AI Buddy
  • Blog
  • Products
    • Payroll Software
      • Compliance
      • Expense Management
      • Compensation
      • Loans & Advances
      • Employee Finances
    • Performance & Careers
      • 360 - Degree Reviews
      • OKRs & Goals
      • Continuous Feedback
    • Modern HR
      • Employee Profiles
      • Documents
      • Task Management
      • Pulse Surveys
      • HR Analytics
    • Time & Attendance
      • Attendance Management
      • GPS / Mobile Attendance
      • Shift Management
    • Recruitment Management
      • Applicant Tracking
      • Employee Onboarding
    • Timesheet Software
    • Integrations
    • Security
    • LMS
    • Mobile App
  • Customers
    • Customers
    • Support
  • Pricing
  • About Us
    • Our Story
    • Our Team
    • Partners
    • Contact Us
  • AI Agents
    • AI ATS
    • AI PMS
    • AI LMS
    • AI Buddy
  • Blog

Core HR

  • Overview
  • Getting Started
  • Tasks
  • Helpdesk
  • Team
  • Documents

Settings

  • Organizational Setup
  • Assets
  • Security
  • Managing Employee Data
  • Employee Groups Management
  • Shifts
  • Utility

Time

  • Live Attendance
  • Employee Overtime
  • Leave Management
  • Employees Attendance

Payroll

  • Run Payroll
  • Loan, Advance And Provident Fund
  • Expenses
  • Payroll Setting
  • Monthly Inputs
  • Email Tax Certificate
  • Sandwich Rule

Team Request

  • View Team Summary
  • Team Requests
  • Team Attendance

Employee Self Service

  • Dashboard
  • My Profile
  • My Account
  • My Attendance
  • My Payslip
  • HR Requests
View Categories
  • Home
  • Docs
  • Security

Security

2 min read

Table of Contents

  • How to Create User Role in Ojoor?
  • How to Create a User Regarding Specific Role?
    • Upload Users:
    • Create a New:
    • Delete User Account
  • How to Restrict User to Mark Attendance from One Device Only?
  • How to Activate or De-Activate the User?

Any HRMS system’s most important feature is security. All data in Ojoor is kept in forms. As a result, it’s critical to specify who can see certain forms. For each form, field, and action, you may set access permissions for your users. You may set permissions for individual form records depending on roles in Ojoor. Only employees with the appropriate access permissions (role-based) will be able to add, modify, view, and delete form records.

How to Create User Role in Ojoor?

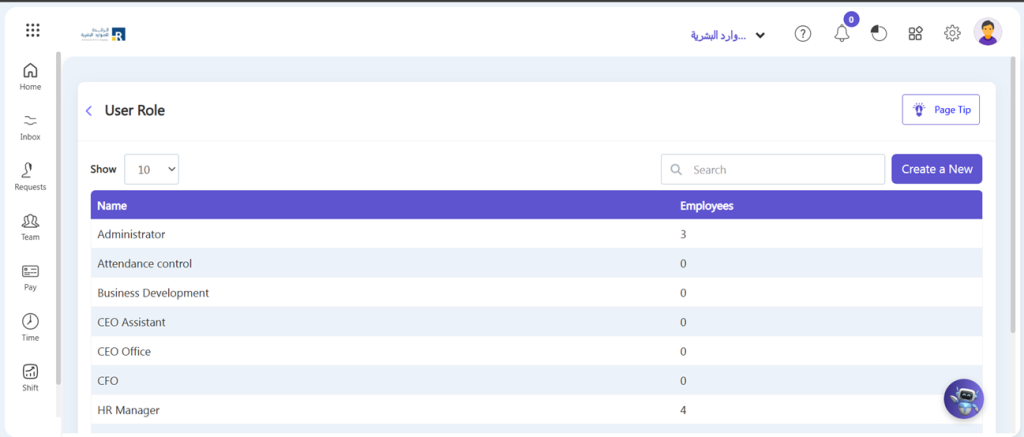
Your organization’s hierarchical architecture is defined by roles. You can assign different rights to roles in terms of accessing data, executing various actions within the system, and so on.

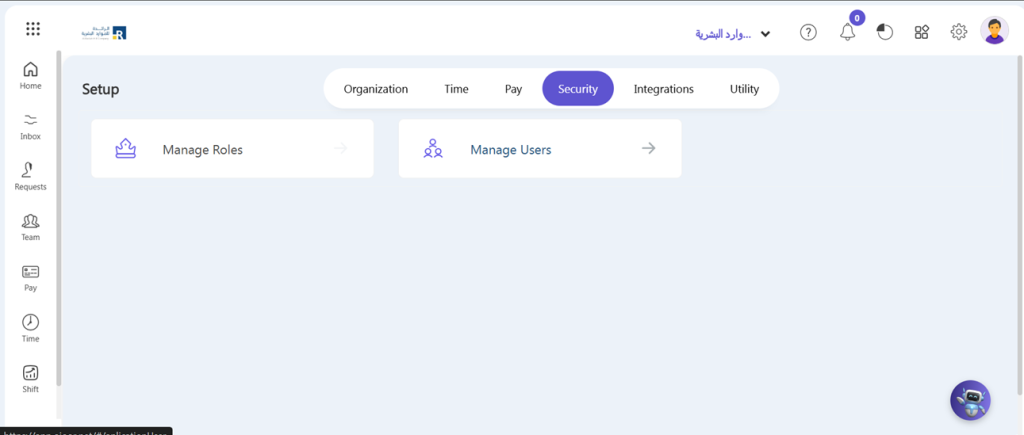
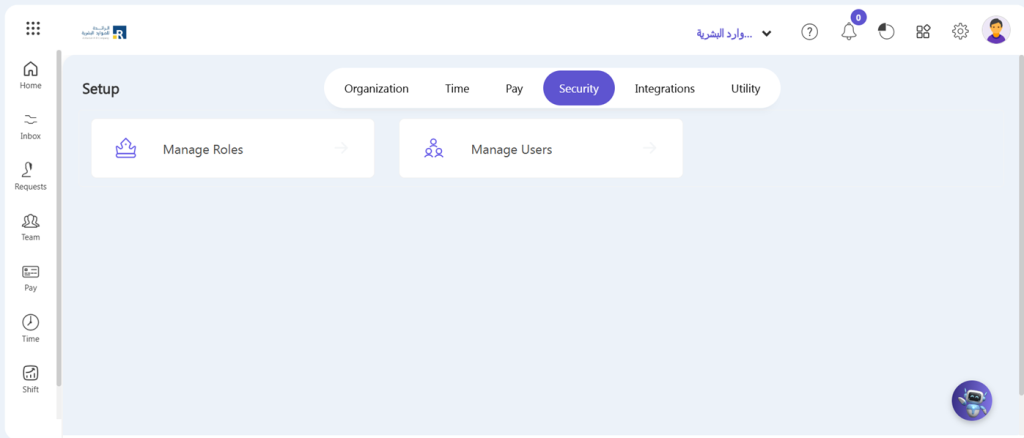
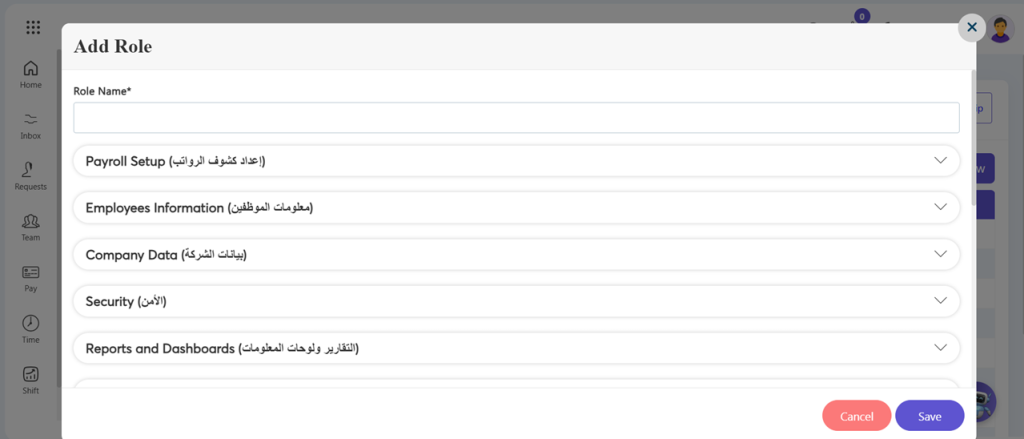
  • Go to Setup->Security->Manage Roles.

  • Add the role name for which you need to configure permissions.
  • Select the module for which you would like to set permissions.
  • How to Create a User Regarding Specific Role?
  • It’s important to have users added to your account once you’ve set up your organizational data. Adding users is a simple process that can be done in a number of ways. There are two ways to add users to your account.
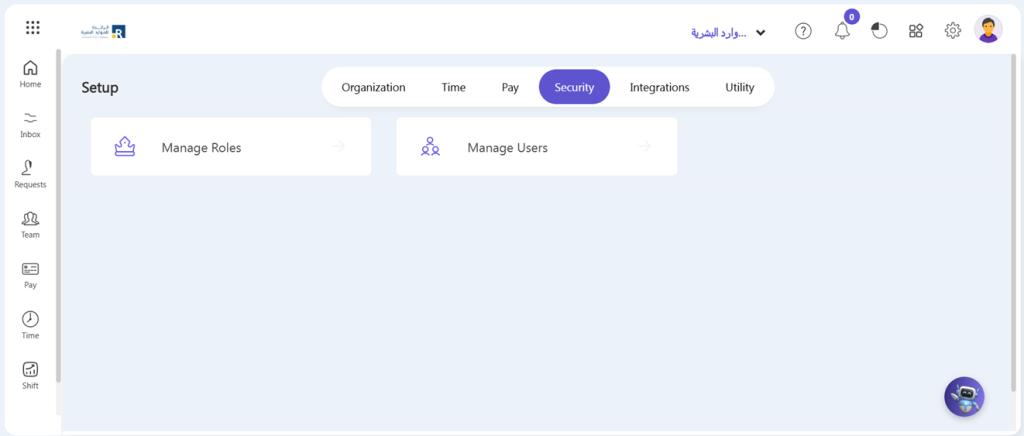
Upload Users:

  • You can also import Data by clicking on Upload.
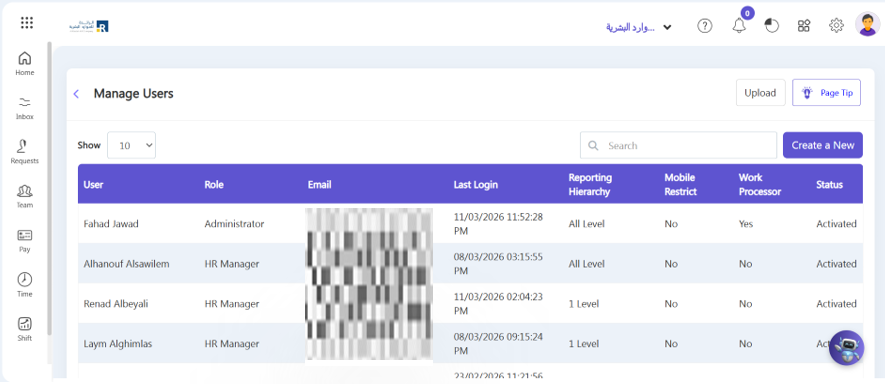
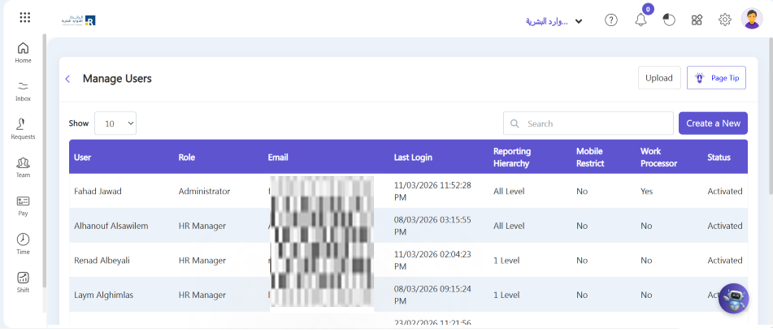
Create a New:

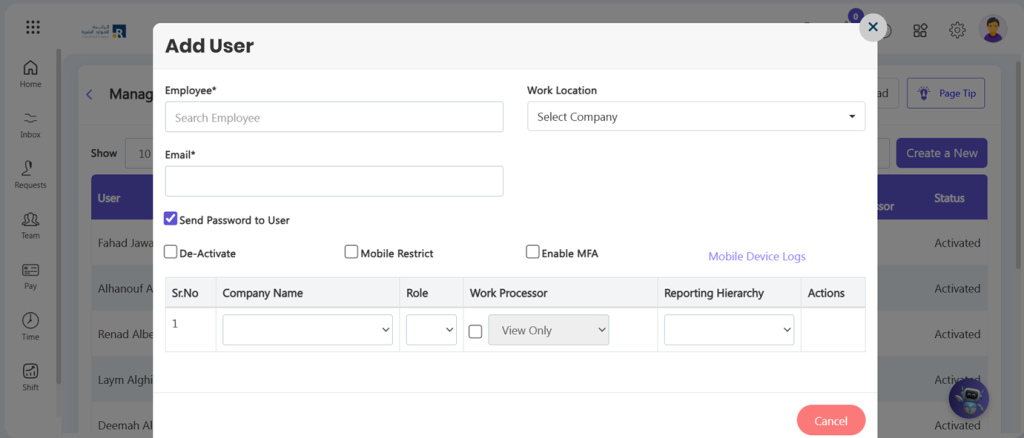
Adding users directly is a method to add users directly to your organization. You can give the users’ usernames and passwords. They can change their password later.

  • Click on “Create a New” in the top right corner.
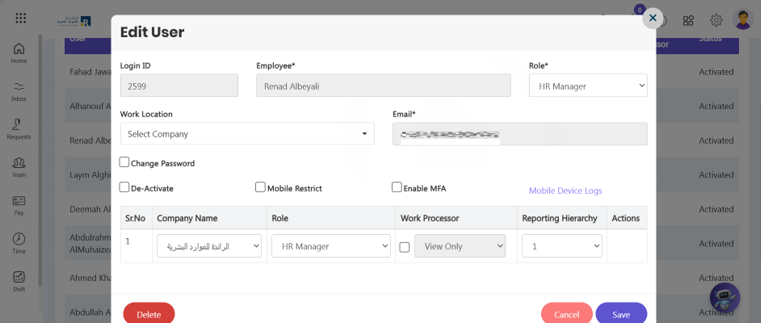
  • Employee: Search for employees by name, and you can assign certain roles to them.
  • Password: Assign a password with their email from the company end.
  • Work Location: You can create a user for particular locations also.
  • Reporting Hierarchy: Here you can select how many users hiereachy you want to show on this profile.
  • Click Save button.

Delete User Account

If you want to delete the any user account follow the following steps:

  • Click on any specific existed user.
  • Click Delete button. User account will be deleted successfully.
How to Restrict User to Mark Attendance from One Device Only?

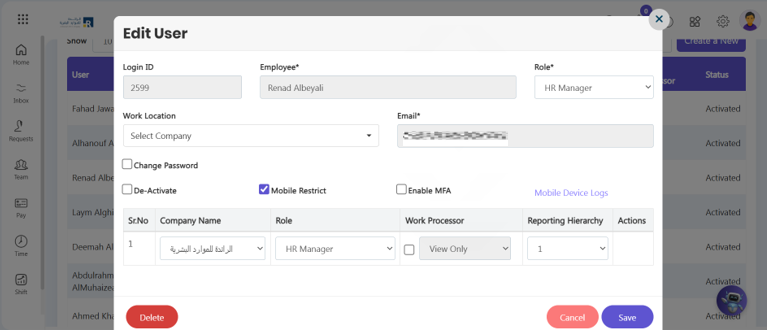
If you’re an administrator on Pay people, you can restrict users to mark attendance from one device only. This feature is useful for ensuring that employees are not marking attendance from multiple devices. Here’s how you can enable this feature:

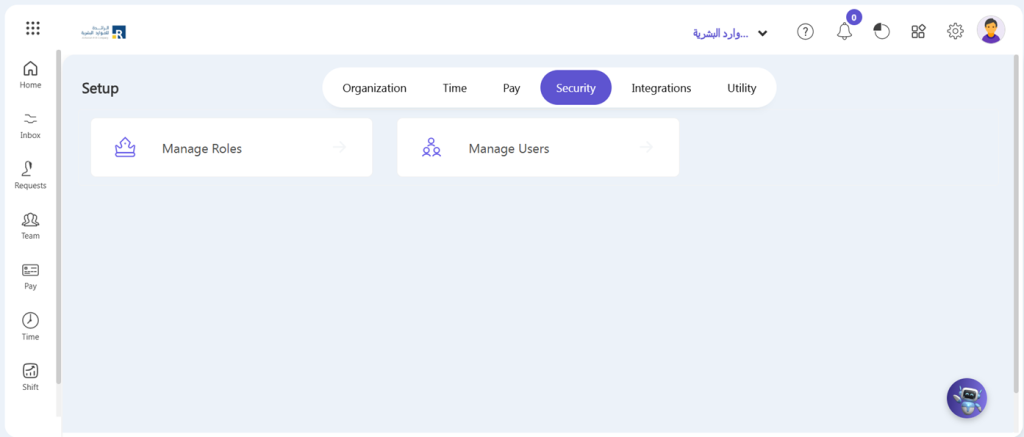
  • Go to Setup > Security > Manage Users
  • Click user on which you want to apply this policy.
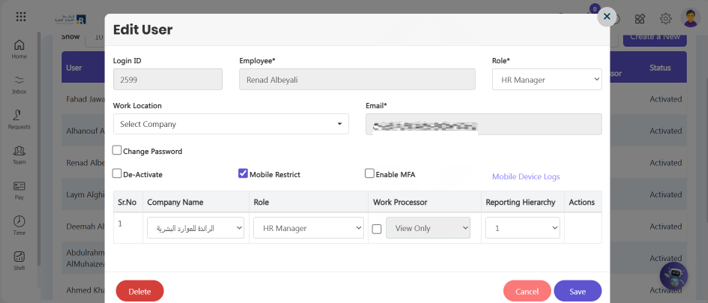
  • Check the checkbox of Mobile Restriction.
  • Click Save button.
  • When user login through Ojoor App he prompts to register his phone.
  • After Register his phone, he cannot login his account through any other mobile.
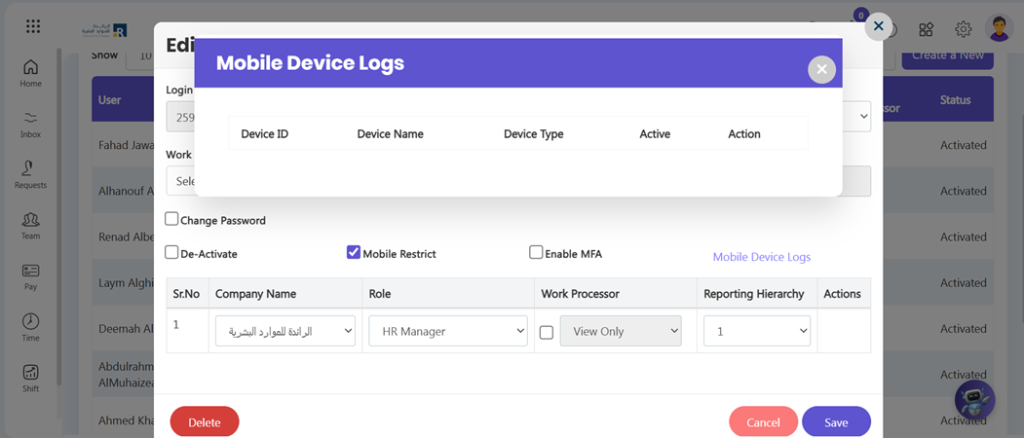
  • As an Admin you can see his mobile login history by click Mobile Device Logs.
  • After click you can see the device details of device.
How to Activate or De-Activate the User? 

If you’re an administrator on Ojoor, you can Activate or De-activate the users account. Here’s how you can enable this feature:

  • Go to Setup > Security > Manage Users
  • Click user on which you want to apply this policy.
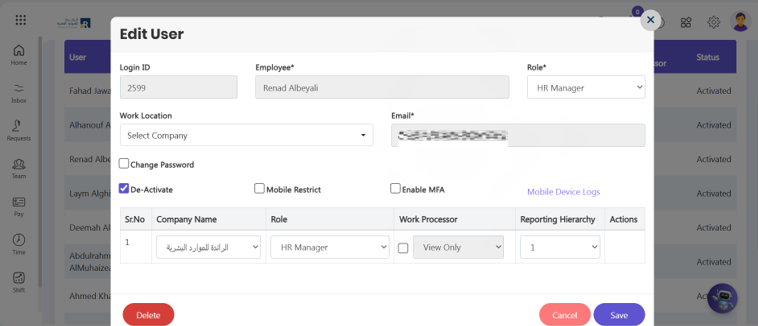
  • Uncheck the checkbox of De-Activate if you want to Activate the user and vice versa.
  • Click Save button.

Updated on April 14, 2026
Organizational SetupManaging Employee Data

Subscribe Newsletter

© 2025 Ojoor. All rights reserved.

Contact

sales@ojoorhr.com


+966547315697

Popular Modules

  • Applicant Tracking System
  • AI-Powered Recruitment and Onboarding
  • Employee Management
  • AI – Powered PMS
  • AI – Powered LMS
  • Best HR Software

Company

  • About Us
  • Contact Us
  • Our Team
  • Customers

Resources

  • Blog
  • Knowledge Base
  • Release Notes
  • FAQs

Terms of Service

Privacy Policy

Security Policy

GDPR Compliance